New features and comparison of Matrix and AdvancedMatrix objects
More recently, the AdvancedMatrix object was implemented in FastReport .NET. In this article, we will look at the structure of the new matrix, its new features, and compare the old and new matrix.
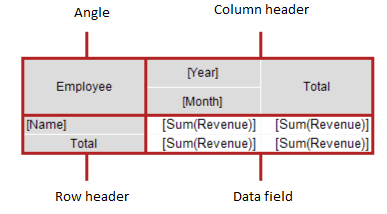
First, let's look at the structure of the matrix. It consists of the following elements:
The structure of the new matrix is very similar to the old one, but there are some minor differences. Let's take a closer look at each element.
Angle
The cells located in the corner of the matrix can contain arbitrary information. You can also split or merge them as you wish.
Header
The matrix header can contain two types of elements:
- “simple element” for displaying static information, such as the text "Total".
- “group” displays a list of values grouped by a certain criterion.
The header has a tree structure where the root element is invisible, but it contains the first level of visible elements.
Arbitrary arrangement of elements is allowed, for example, the header may not have a group, or it can have several groups located near each other. The results can also be arranged in an arbitrary way.
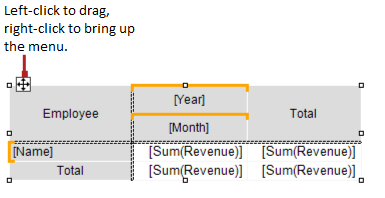
In design mode, the matrix displays visual cues in the title area:
The last element is the cells in the data area, which typically contain an aggregate function.
So, we’ve reviewed in more detail the elements of the new matrix. Let's now look into new features. Here is the list of new developments.
- Row and column headings can contain groups and simple items in any order. This allows you to build asymmetric reports.
- Minimize buttons that let you interactively control the visibility of individual elements.
- Sort buttons let you interactively sort the matrix by selected values, including total values.
- TopN group allows you to display N values in the header, and group the other values into a separate element with the ability to expand.
- Display of matrix headers in stepped layout.
- Sorting of headers by total values.
- New set of aggregate functions.
- Support for custom aggregate functions.
- A wide range of special functions allows you to get the values of totals, neighboring cells, as well as functions for calculating percentages.
- Support for "Sparkline" and "Progress Bar" objects in data cells.
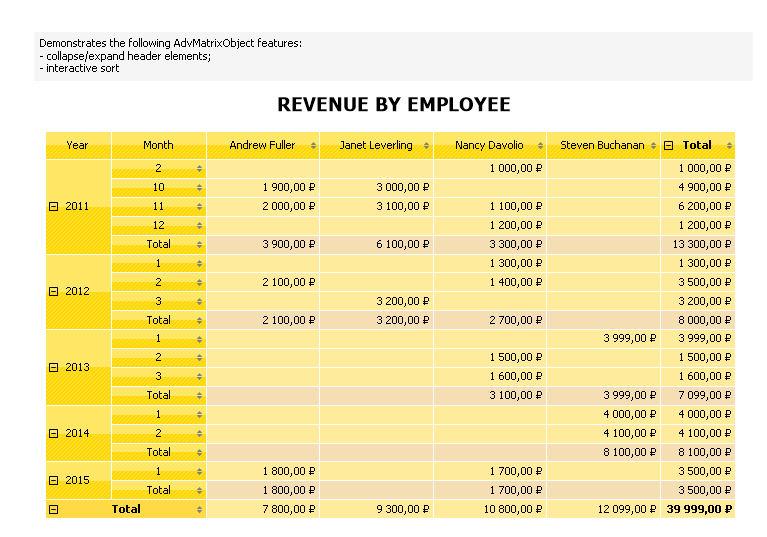
Next, we'll take a look at a screenshot that clearly shows the location of the buttons.
We can see that new features in AdvancedMatrix are more about flexibility and, most importantly, convenience.
Interactive collapse and unfolding allow you to hide or show the required data.
Block or staggered arrangement of elements was made in order not to get confused in the visual layout of matrix and to understand where the data is located. There is also quite a convenient sorting option.
Let's now start setting up the matrix. In order to set up the entire matrix, you need to:
1). Customize headers;
2). Set up data cells;
3). Add totals. This step is best done last to save time setting up new data cells.
Do not forget that the matrix must be connected to the data source, the DataSource property is responsible for this.
In general, the settings of these three items are the same and resemble a regular matrix. You can add items by dragging a field from the Data window. When dragging, you will see in which part of the header the new element will be added.
To delete an element, select the "Delete" item in the context menu. You can delete only the selected element or the tree of elements (the selected element and all its children).
You can also delete an element by pressing the Delete key. In this case, only the selected element will be deleted.
Now you can move the element. To place an element in a new location, select it with the left mouse button. The element will be outlined with a thick black border (as shown in the screenshot).
Then grab the element and move it to a new location.
Release the mouse button and the element will be moved to the new location:
Finally, editing. To call the element editor, double-click on it with the left mouse button, or select the "Edit..." item in the context menu. You can also call the editor with the Enter key.
To call the context menu, select any element of the matrix, and then right-click on the area in the upper left corner of the matrix.
The following commands are available on the menu.
- Style is available from preset options.
- Swap columns and rows allow you to quickly swap columns and rows in a matrix.
- Repeat headings on a new page - if the matrix takes several pages, then column and row headings will be printed on each page.
Let's sum up. We have learned how to set up a table and looked into its structure. Overall, everything was done as simply and conveniently as possible.
Let's create our matrix in the designer. To do this, we need to find the Matrix object, click on it and select Advanced Matrix from the drop-down list.
We move the object to the Data band, fill it with data and add totals.
Now we configured the stepped layout. To do this, double-click on the element, go to the other tab and check the Staggered layout box. Next, enable the minimize buttons. Right-click on the desired element and select the collapse button. Now, our matrix in the designer looks like this:
In the preview mode:
After reviewing the structure, we learned about the new features of AdvancedMatrix, its settings, and how to create it from the designer. Let's take a look at one of the ready-made Advanced Matrix templates in the FastReport.Net Demo.
Using this template, you can familiarize yourself with the new matrix, try out the new features yourself. You can find more information in our documentation.
From all of the above, we can conclude that the new matrix is much more convenient to work with, because there is interactive sorting, block, or staggered arrangement of elements, and you won’t be confused about the matrix. If you have any questions, please contact our support. We will be pleased to answer your questions. Good luck in using it!


