How to use FastRerport.Core in Vue.js application
The framework Vue.js is now very popular and is on a par with Angular. We have already considered the way to use FastReport.Core in the Angular application,. Now let's see how to implement the display of the FastReport web report in a one-page application on Vue.js with a backend on ASP .Net Core.
To have the work done, we need to install Node.js and the Net Core SDK 2.0 or more “fresh”. By default, dotnet sdk does not have a vue application template. But you can install it. To do this, create a directory in which you want to place your future application and run the PowerShell command line in it. This can be done from the context menu, which is invoked by right-clicking on the empty space in the folder with the shift key held down.
At the command prompt, enter the command:
dotnet new - install Microsoft.AspNetCore.SpaTemplates :: *
After that, the Vue template will be available to you to generate a demo application.
Use it and create an application with the command:
dotnet new vue -o FRCoreVue
After creating the application, you will see a warning that you need to run the command:
npm install
But before you execute it, you need to go to the created directory:
cd FRCoreVue
After installing all the necessary packages open the project file .csproj.
To work with FastReport, install packages in the NuGet manager. Select the local package source located in the folder: J: \ Program Files (x86) \ FastReports \ FastReport.Net \ Nugets.
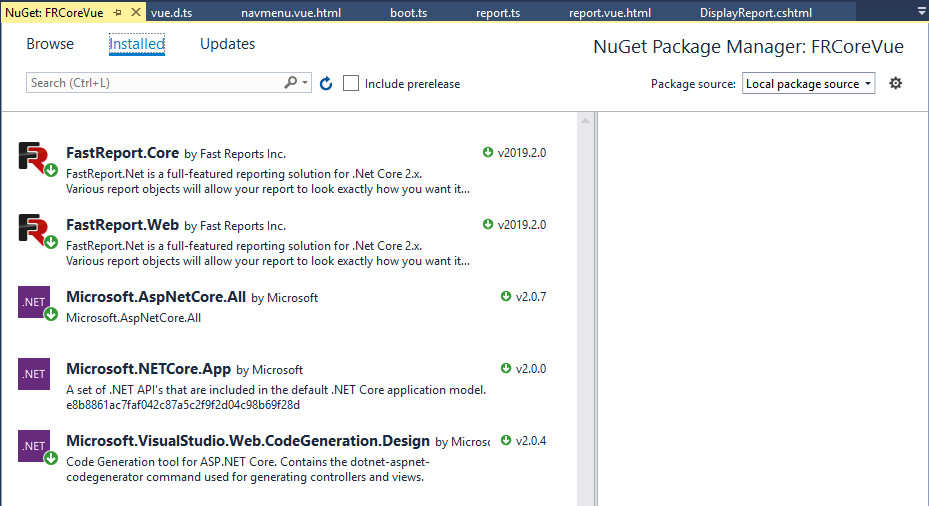
Install packages: FastReport.Core and FastReport.Web.
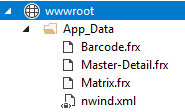
To display the reports, we need the report templates and the data source for them. Therefore, in the wwwroot directory, create the App_Data folder and put the desired report templates and database there (if you are using a file data source).
In the Startup.cs file, add a line of code to the Configure method:
app.UseFastReport();
In the Controllers folder, open the SampleDataController.cs file. In this class there are already several demonstration methods, we do not need them, they can be safely removed. Instead, add your own method:
1 2 3 4 5 6 7 8 9 10 11 12 13 14 15 16 17 18 19 20 21 22 23 24 25 26 27 28 29 30 31 32 33 34 |
using System; using System.Collections.Generic; using System.Linq; using Microsoft.AspNetCore.Mvc; using FastReport.Web; using Microsoft.AspNetCore.Hosting; namespace FRCoreVue.Controllers { [Route("api/[controller]")] public class SampleDataController : Controller { private IHostingEnvironment _env; public SampleDataController(IHostingEnvironment env) { _env = env; } [HttpGet("[action]")] public IActionResult DisplayReport(string name) { var webRoot = _env.WebRootPath; WebReport WebReport = new WebReport(); WebReport.Width = "1000"; WebReport.Height = "1000"; WebReport.Report.Load(System.IO.Path.Combine(webRoot, (String.Format("App_Data/{0}.frx", name)))); // Load the report into the WebReport object System.Data.DataSet dataSet = new System.Data.DataSet(); // Create a data source dataSet.ReadXml(System.IO.Path.Combine(webRoot, "App_Data/nwind.xml")); // Open the xml database WebReport.Report.RegisterData(dataSet, "NorthWind"); // Registering the data source in the report ViewBag.WebReport = WebReport; // pass the report to View return View(); } } |
The DisplayReport method takes the parameter “name”, which is the name of the report. Thus, this method loads the desired report template into the WebReport object. Right click on the method signature and select Add view ... from the menu.
The view creation window will open. Just click Ok. Replace the code in the created view with the following:
1 |
@await ViewBag.WebReport.Render()
|
We now turn to the client application on Vue. In the project tree, expand the ClientApp-> components folder. Here are the components: pages, menus, etc. We will create our own component. Add the report folder. Create the file report.vue.html in it:
1 2 3 4 5 6 7 8 9 10 11 12 13 14 15 16 17 |
<template> <div> <div id="app"> <select v-model="report"> <option>Matrix</option> <option>Master-Detail</option> <option>Barcode</option> </select> </div> <button v-on:click="Clicked">Show Report</button> <div v-if="show"> <iframe :id="report" height="1000" width="1000" :src="url"></iframe> </div> </div> </template> <script src="./report.ts"></script> |
The page template will display a drop-down list of reports. Selecting a value and clicking the Show Report button will display the frame with the report. Variable-flag show is responsible for displaying the frame. By default, its value is false and the frame is not displayed. But after loading the report, its value will change to true and the frame will be displayed. Now we will implement the script for processing the report.ts template, which we will add to the same report folder:
1 2 3 4 5 6 7 8 9 10 11 12 13 14 15 16 |
import Vue from 'vue'; import { Component } from 'vue-property-decorator'; @Component export default class ReportComponent extends Vue { report: string = 'Matrix'; url: string = ''; show: boolean = false; Clicked() { if (this.report != null) { this.show = true; this.url = "api/SampleData/DisplayReport?name=" + this.report; } } } |
The variable report has a default value so that it is selected initially in the drop-down list. The Clicked function forms a link to the method in the controller based on the selected report name, and also sets the value of the show flag.
Now remove the unnecessary links to the demo pages from the site side menu in the file navmenu.vue.html:
1 2 3 4 5 6 7 8 9 10 11 12 13 14 15 16 17 |
<template> <div class="main-nav"> <div class="navbar navbar-inverse"> <div class="navbar-header"> <button type="button" class="navbar-toggle" data-toggle="collapse" data-target=".navbar-collapse"> <span class="sr-only">Toggle navigation</span> <span class="icon-bar"></span> <span class="icon-bar"></span> <span class="icon-bar"></span> </button> <a class="navbar-brand" href="/">FRCoreVue</a> </div> </div> </div> </template> <style src="./navmenu.css" /> |
And also edit the file boot.ts, in which the components are loaded:
1 2 3 4 5 6 7 8 9 10 11 12 13 14 15 |
import './css/site.css'; import 'bootstrap'; import Vue from 'vue'; import VueRouter from 'vue-router'; Vue.use(VueRouter); const routes = [ { path: '/', component: require('./components/report/report.vue.html') } ]; new Vue({ el: '#app-root', router: new VueRouter({ mode: 'history', routes: routes }), render: h => h(require('./components/app/app.vue.html')) }); |
Now our component will be displayed on the main page. Run the application:
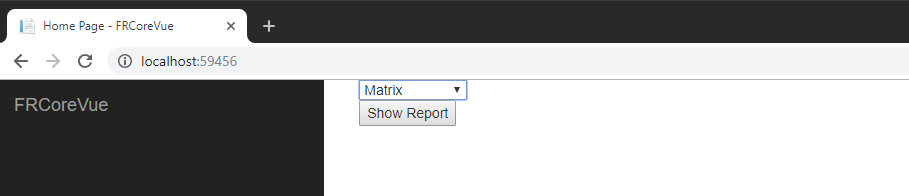
We see a blank page with a drop-down list and a button. Expand dropdown list:
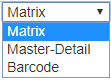
We have three reports available. Let's select Master-Detail and click the Show Report button:
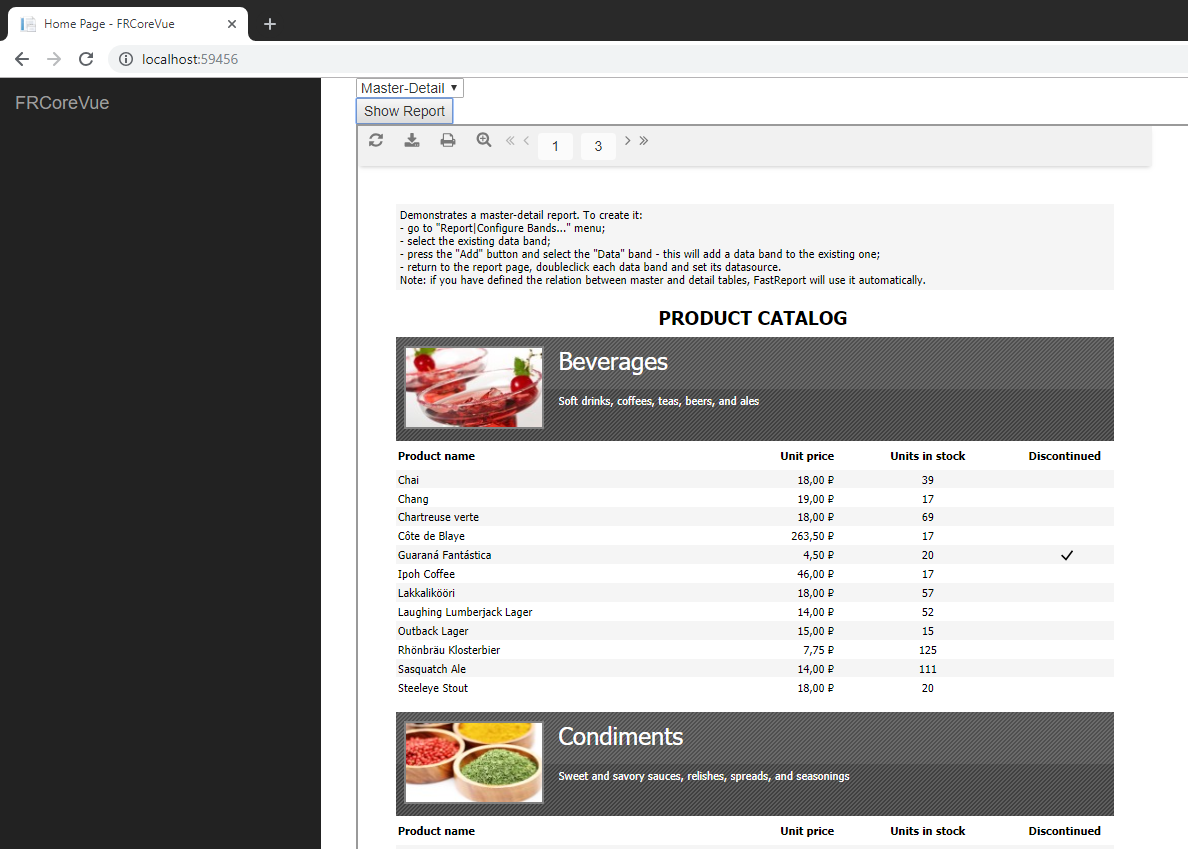
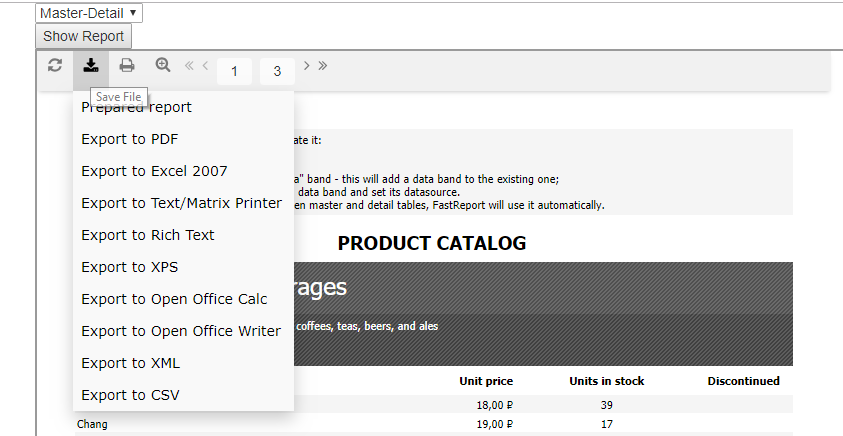
And we get a report. At the same time, all functions from the web report toolbar are available to us. For example, export:
We implemented the web report display in a one-page application written on Vue.js. As you can see, the implementation is quite simple thanks to the configured bundle of Vue + ASP .Net Core.