Saving images from Delphi / C++ Builder / Lazarus
BMP, JPEG, TIFF, GIF – there is a variety of raster image formats.
 1. BMP
First of all, you should know that since BMP is an old image format it is not so popular among Internet users, only the bitmap images are saved in this format which doesn’t support the vector ones.
The size of .bmp files can differ, depending on the quality of the images. Despite the fact that users consider the BMP format obsolete, it is actively used in many spheres. For example, all Windows interfaces were based on this format. Why exactly BMP? Because it is convenient to use when creating images that do not lose quality after editing them. BMP is often used in Photoshop when editing images, this format is also easy to upload to social networks and various websites.
Of course, it is better to use modern image formats, as they are multi-layered and you can upload them to any website without technical issues. At the same time, there are many options to edit these images and they have a smaller file size.
 2. JPEG
JPEG is a commonly used format for storing images. It has a good compression quality for viewing pictures. This format has many benefits because the user has several advantages, such as: the ability to change the quality and size of the file, open the image in any browser with ease, editing this file in any graphic editors, as well as low size, which doesn’t take much space on computers and other data storage devices. If you do not compress much, the quality of the image will be completely saved.
This format has few disadvantages:
a) There is no transparency unlike, for example, PNG.
b) If you compress (resize) the JPG image, its distortion (or complete loss) will be noticeable.
c) It is not recommended to edit the restored JPG file after compression, as it may lose the quality.
Despite these drawbacks, this format is considered the most popular on the internet and people use it a lot.
 3. TIFF
This is a well-known raster format that supports almost all known color spaces. Images without compression has almost become the standard in the printing industry. There are various compression algorithms with or even without losses. A TIFF file can contain an image stored in the CMYK, RGB, Lab color models in indexed color mode, as well as in grayscale. This allows to use this format for storing a variety of images, used both for the preparation of web-graphics and typography. In addition to the image itself, the TIFF contains transparency channels which allows you to save transparent areas of the image or highlight objects between work sessions.
Another feature of the TIFF format is the ability to save multiple images that have their own sets of attributes and properties (tags) in one file. This makes TIFF similar to GIF, though it doesn’t have the ability to create animated images.
The popularity of this format makes it easy to transfer images between programs and hardware platforms.
 4. GIF
GIF files have small size and support simple animations, i.e. changing frames in one file.
GIF format is widespread in the field of creating banners, as well as the graphic shell of video content. The main advantage is data compression without an obvious loss of quality at a depth of up to 256 colors. Animated images consist of a number of static frames, as well as data on the required time of demonstration of a frame.
People use the GIF format in many fields. For example, in the design of their sites, web design, graphic design, while writing articles or books, on social networks, in the form of advertising banners, for storing photos and so on.
Using this format, you can reduce the size of the image, which positively affects the speed of loading pages of the Internet website.
 5. SVG
This format is a vector one. In short, the websites are compiled with its help. SVG is an XML text file with tags.
This format doesn’t lose the image quality when scaling and cropping. For more information on the advantages and disadvantages of SVG format, as well as about saving it from Delphi, see here.
Now we know when and which format is better to use.
So how can we export to these formats from a Delphi / Lazarus application?
Easy! Of course, this is not our primary goal, there are many options. We are interested in the opportunities of FastReport VCL, because using it we can prepare a document, a poster, a banner – fortunately, the visual designer includes graphic primitives and many objects with effects. You can immediately see an, if needed, change / edit the document before exporting it to the desired image format.
So, we need to create / save / export to BMP or GIF from Delphi?
First we have to create a document. Simple or complex – there is no difference.
Now, after we created the object that we want to turn into an illustration, launch and look.
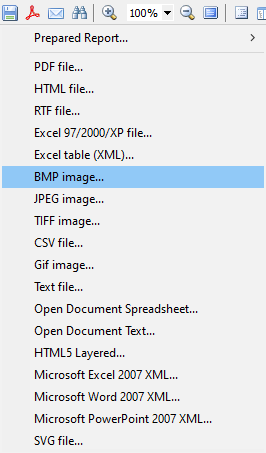
In the preview window, we select the format for saving the report.
For example, we need to export to BMP image. Select and click.
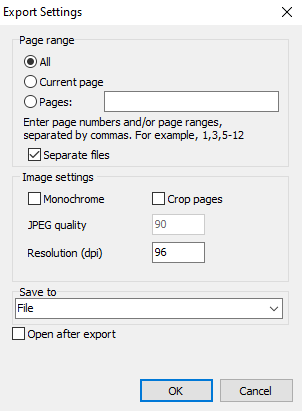
The export settings window will appear. Configure and save.
Let’s talk a bit about settings.
We can save all pages, current page or a range.
Here are the screenshots to compare the settings of different formats: (TIFF, JPEG,GIF)
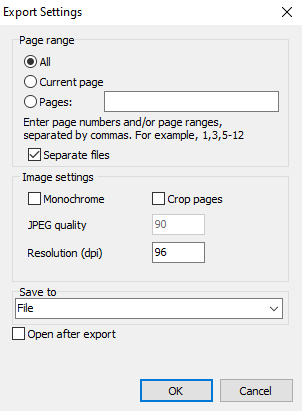
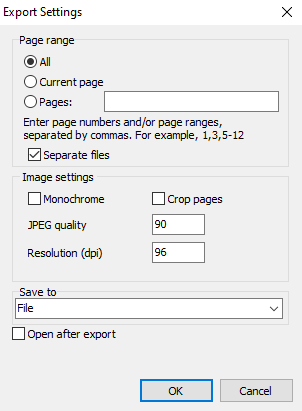
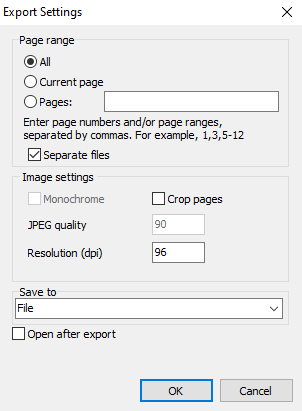
In some cases, some settings are not available (format differences).
Monochrome – images in shades of black;
Crop pages – whether to crop pages;
JPEG quality – setting the quality of the graphic object;
Resolution (dpi) – dots per inch;
Open after export – opening the document automatically after the export.
You can specify where to save your file (in the local storage, send as E-mail, upload to FTP or cloud storage).
Well, now we learned how to easily save the report in graphical formats from Delphi / C++Builder / Lazarus from the preview window.
But how can we save BPM/JPEG/TIFF/GIF directly from the Delphi / C++Builder / Lazarus code?
Here is how!
| Export to BMP | |
1 2 3 4 5 6 7 8 9 10 11 12 13 14 15 16 17 18 19 20 21 22 23 24 25 26 27 28 |
procedure TForm1.Button1Click(Sender: TObject); begin {Generate a report. The report must be generated before exporting} frxReport1.PrepareReport(); {Set the range of pages to export. By default, all pages of the generated report are exported} frxBMPExport1.PageNumbers := '2-3'; {Set whether to export each page to a separate file.} {.N will be added to the file name, where N is the serial number of the page} frxBMPExport1.SeparateFiles := True; {Set whether to export to monochrome image} frxBMPExport1.Monochrome := False; {Set whether to crop empty edges (page margins)} frxBMPExport1.CropImages := False; {Set the resolution, DPI} frxBMPExport1.Resolution := 96; {Set whether to open the resulting file after export} frxBMPExport1.OpenAfterExport := False; {Set whether to display export progress (show which page is currently being exported)} frxBMPExport1.ShowProgress := False; {Set whether to display the export filter dialog box} frxBMPExport1.ShowDialog := False; {Set the name of the resulting file.} {Please note that if you do not set the file name and disable the export filter dialog box,} {the file name selection dialog will still be displayed} frxBMPExport1.FileName := 'C:\Output\test.bmp'; {Export the report} frxReport1.Export(frxBMPExport1); end; |
| Export to JPEG | |
1 2 3 4 5 6 7 8 9 10 11 12 13 14 15 16 17 18 19 20 21 22 23 24 25 26 27 28 29 30 |
procedure TForm1.Button2Click(Sender: TObject); begin {Generate a report. The report must be generated before exporting} frxReport1.PrepareReport(); {Set the range of pages to export. By default, all pages of the generated report are exported} frxJPEGExport1.PageNumbers := '2-3'; {Set whether to export each page to a separate file.} {.N will be added to the file name, where N is the serial number of the page} frxJPEGExport1.SeparateFiles := True; {Set whether to export to monochrome image} frxJPEGExport1.Monochrome := False; {Set whether to crop empty edges (page margins)} frxJPEGExport1.CropImages := False; {Set the quality of JPEG} frxJPEGExport1.JPEGQuality := 90; {Set the resolution, DPI} frxJPEGExport1.Resolution := 96; {Set whether to open the resulting file after export} frxJPEGExport1.OpenAfterExport := False; {Set whether to display export progress (show which page is currently being exported)} frxJPEGExport1.ShowProgress := False; {Set whether to display the export filter dialog box} frxJPEGExport1.ShowDialog := False; {Set the name of the resulting file.} {Please note that if you do not set the file name and disable the export filter dialog box,} {the file name selection dialog will still be displayed} frxJPEGExport1.FileName := 'C:\Output\test.jpg'; {Export the report} frxReport1.Export(frxJPEGExport1); end; |
| Export to TIFF | |
1 2 3 4 5 6 7 8 9 10 11 12 13 14 15 16 17 18 19 20 21 22 23 24 25 26 27 28 |
procedure TForm1.Button3Click(Sender: TObject); begin {Generate a report. The report must be generated before exporting} frxReport1.PrepareReport(); {Set the range of pages to export. By default, all pages of the generated report are exported} frxTIFFExport1.PageNumbers := '2-3'; {Set whether to export each page to a separate file.} {.N will be added to the file name, where N is the serial number of the page} frxTIFFExport1.SeparateFiles := True; {Set whether to export to monochrome image} frxTIFFExport1.Monochrome := False; {Set whether to crop empty edges (page margins)} frxTIFFExport1.CropImages := False; {Set the resolution, DPI} frxTIFFExport1.Resolution := 96; {Set whether to open the resulting file after export} frxTIFFExport1.OpenAfterExport := False; {Set whether to display export progress (show which page is currently being exported)} frxTIFFExport1.ShowProgress := False; {Set whether to display the export filter dialog box} frxTIFFExport1.ShowDialog := False; {Set the name of the resulting file.} {Please note that if you do not set the file name and disable the export filter dialog box,} {the file name selection dialog will still be displayed} frxTIFFExport1.FileName := 'C:\Output\test.tif'; {Export the report} frxReport1.Export(frxTIFFExport1); end; |
| Export to GIF | |
1 2 3 4 5 6 7 8 9 10 11 12 13 14 15 16 17 18 19 20 21 22 23 24 25 26 27 28 |
procedure TForm1.Button4Click(Sender: TObject); begin {Generate a report. The report must be generated before exporting} frxReport1.PrepareReport(); {Set the range of pages to export. By default, all pages of the generated report are exported} frxGIFExport1.PageNumbers := '2-3'; {Set whether to export each page to a separate file.} {.N will be added to the file name, where N is the serial number of the page} frxGIFExport1.SeparateFiles := True; {Set whether to export to monochrome image} frxGIFExport1.Monochrome := False; {Set whether to crop empty edges (page margins)} frxGIFExport1.CropImages := False; {Set the resolution, DPI} frxGIFExport1.Resolution := 96; {Set whether to open the resulting file after export} frxGIFExport1.OpenAfterExport := False; {Set whether to display export progress (show which page is currently being exported)} frxGIFExport1.ShowProgress := False; {Set whether to display the export filter dialog box} frxGIFExport1.ShowDialog := False; {Set the name of the resulting file.} {Please note that if you do not set the file name and disable the export filter dialog box,} {the file name selection dialog will still be displayed} frxGIFExport1.FileName := 'C:\Output\test.gif'; {Export the report} frxReport1.Export(frxGIFExport1); end; |
After seen how we can create and export to such formats, we come to the conclusion that it is extremely easy! But please – do not exploit these features! Very often (for example, many software products for generating tax reports or 1040-SR forms) allow to save the resulting file only in a certain closed format, send it to print or save as TIFF – unfortunately, this option doesn’t withstand any criticism from the point of view further use. It can only be admired or printed. After all, it doesn't cost you anything to export these documents to PDF (or, if necessary – PDF/A), ODS, ODT, RTF, DOCX, XLSX – with full support of relevant standards but much more convenient for working with them as text documents.