How to use FastReport reports in PHP application. Part 1.
FastReport.Net was created specially for the .net platform. Accordingly, web reports work with ASP.Net and ASP.Net Core technologies.
But, still, most websites on the World Wide Web are written in PHP. And many would like to display FastReport reports in their php applications. As you know, this is possible thanks to the http protocol. We will just use the PHP application as the client part, and ASP.Net Core as the server part.
We will provide a report output, a report designer output and a report downloading in one of the two php and html formats (two formats will be enough as a demonstration).
Thus, in the php application there will be three pages: displaying the report, displaying the report designer, downloading the report.
Let's proceed with the implementation of the server side. The most suitable choice of technology is ASP.Net Core, as it is cross-platform, which means the application can run on a Linux server as well. According to statistics, Linux server is the most popular solution for hosting web sites.
First of all, we need to download the report designer from the developer's site. To download it, you must first assemble it in a special configurator. Pay attention to one option on which the designer will work in your project.

You need to choose FastReport.Web for Core.
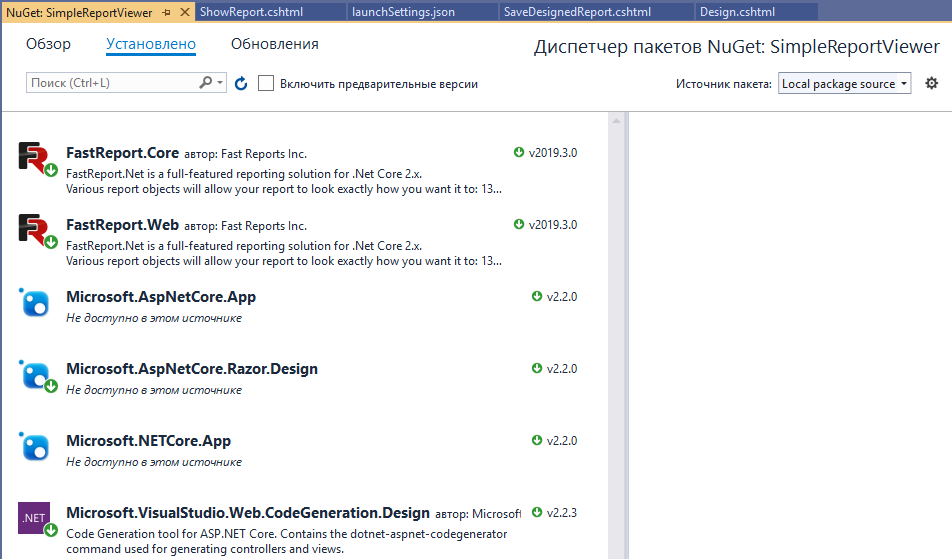
So, let's create an ASP.Net Core application. To use FastReport web reports in it, you need to install packages in the NuGet manager. These packages are located in the FastReport.Net installation directory, in the Nuget folder. Therefore, you will have to configure the local package source in the NuGet package manager.
As a result, you should install the packages: FastReport.Core and FastReport.Web.
To use libraries in your project, include them in the Startup.cs file:
1 2 3 4 5 6 |
public void Configure(IApplicationBuilder app, IHostingEnvironment env) { … app.UseFastReport(); … } |
To use libraries in your project, include them in the Startup.cs file:
1 2 3 4 5 6 7 8 9 10 11 12 13 14 15 16 17 18 19 20 21 22 23 24 25 26 27 28 29 30 31 32 33 34 35 36 37 38 39 40 41 42 43 44 |
using FastReport.Web; using System.IO; using FastReport; using FastReport.Export.Html; using FastReport.Export.Pdf; using SimpleReportViewer.Models; using System.Data; using FastReport.Utils; namespace SimpleReportViewer.Controllers { [Route("api/[controller]")] public class ReportsController : Controller { private IHostingEnvironment _env; // Web application directory path public string webRoot { get { return _env.WebRootPath; } set { } } public ReportsController(IHostingEnvironment env) { _env = env; } // Show report by name [HttpGet("[action]")] public IActionResult ShowReport(string name) { if (name == null) name = "Master-Detail.frx"; WebReport WebReport = new WebReport(); WebReport.Width = "1000"; WebReport.Height = "1000"; WebReport.Report.Load(String.Format("{0}/App_Data/{1}", webRoot, name)); // Download the report to the WebReport object System.Data.DataSet dataSet = new System.Data.DataSet(); // Download the report to the WebReport object dataSet.ReadXml(String.Format("{0}/App_Data/nwind.xml", webRoot)); // Open the xml database WebReport.Report.RegisterData(dataSet, "NorthWind"); // Register the data source in the report ViewBag.WebReport = WebReport; // Pass the report to View return View(); } } |
First, we got the path to the wwwroot application folder. And then, we implemented a method for obtaining a report. This method should get the name of the report, in case if the report name is not passed. For this web method you need to create a view. To do this, right-click on the signature of the method and select "Add view ..." from the drop-down menu. Next, just click OK.
In the created application, replace the code with:
@await ViewBag.WebReport.Render()
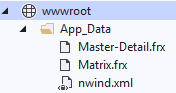
We have links to reports, but we still have not added the reports themselves to the project. Create an App_Data folder and add reports and a database for them:
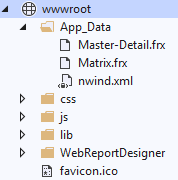
Also, in wwwroot we place the folder with the report designer:
Now we can add the report designer display method to our ReportsController:
1 2 3 4 5 6 7 8 9 10 11 12 13 14 15 16 17 18 19 20 21 22 23 24 25 |
// Static variable for storing the report name public static string ReportName; // We show the designer with a report [HttpGet("[action]")] public IActionResult Design(string name) { if (name == null) name = "Master-Detail.frx"; var webRoot = _env.WebRootPath; WebReport WebReport = new WebReport(); WebReport.Width = "1000"; WebReport.Height = "1000"; WebReport.Report.Load(System.IO.Path.Combine(webRoot, (String.Format("App_Data/{0}", name)))); // Download the report to the WebReport object System.Data.DataSet dataSet = new System.Data.DataSet(); // Create a data source dataSet.ReadXml(System.IO.Path.Combine(webRoot, "App_Data/nwind.xml")); // Open the xml database WebReport.Report.RegisterData(dataSet, "NorthWind"); // Register the data source in the report ReportName = name; WebReport.Mode = WebReportMode.Designer; // Set the mode of the object web report - display designer WebReport.DesignerLocale = "en"; WebReport.DesignerPath = "/WebReportDesigner/index.html"; // Set the URL of the online designer WebReport.DesignerSaveCallBack = "api/reports/SaveDesignedReport"; // Set the view URL for the report save method WebReport.Debug = true; ViewBag.WebReport = WebReport; // Pass the report to View return View(); } |
This method also receives the report name as a parameter. To display the designer, the WebReport object is used. The important point here is to set the correct paths to the designer and handler of the report saving event.
Create a view for this method with simple code:
1 2 3 4 5 |
@{ ViewData["Title"] = "Design"; } @await ViewBag.WebReport.Render() |
Add another method to the controller to handle the save event of the report edited in the designer:
1 2 3 4 5 6 7 8 9 10 11 12 13 14 15 |
// call-back for save the designed report [HttpPost("[action]")] public IActionResult SaveDesignedReport(string reportID, string reportUUID) { var webRoot = _env.WebRootPath; ViewBag.Message = String.Format("Confirmed {0} {1}", reportID, reportUUID); // We set the message for presentation Stream reportForSave = Request.Body; // We write the result of the Post request to the stream string pathToSave = System.IO.Path.Combine(webRoot, @"App_Data/"+ ReportName); // We get the path to save the file using (FileStream file = new FileStream(pathToSave, FileMode.Create)) // Create a file stream { reportForSave.CopyTo(file); // Save the result of the request to a file } return View(); } |
Please note that we save the report to the App_Data folder with the same name, due to the fact that we saved the report name when we opened it in the designer. Thus, the original report will be replaced by the edited one.
Looking ahead, I will say that you will see the inscription saved in the designer if this method is executed without errors.
Let’s finish the first part of the article on this. In the second part, we will consider a method for obtaining export of a report by url.