Page description language – ZPL
ZPL - Zebra Programming Language - the language of description of printed pages, also known as PDL (Page Description Language). There are many PDLs. Almost every printer manufacturer has its own page description language. This language allows you to describe the page by high-level commands, which will be interpreted by the printer in low-level ones. The most famous PDL is PostScript from Adobe. The PDL allows to describe page objects. There is something, that makes the program be independent from a particular hardware platform of a printer. The printer receives commands for printing a square, a symbol or a line and we do not care how it will be realized. The printer itself knows how to do this. This is the main advantage of the PDL.
American company "Zebra Technologies" has developed the ZPL mainly for creating and printing of labels. Labels can contain a text, barcodes and simple graphics. Such labels are printed with special Zebra printers, which are used in the trade for printing receipts and checks.
There are two standards: ZPL and ZPL ll.
Differences
The main reason for development of ZPL II was a significant reduction of the time when a printer starts to receive data and when the first character goes to be printed. This was made primarily by changing the way of how ZPL programs are written.
The ZPL II standard is not 100% compatible with the ZPL standard. But the differences between are minimal. All programs on the ZPL can easily be modified to the level of ZPL ll. There is a backward compatibility. That is, you can write programs on the ZPL ll for ZPL printers, of course, taking into account the old syntax.
So, here are two main differences between ZPL ll and ZPL:
1. In ZPL II the data is formatted immediately as received. And in the ZPL standart, the formatting does not start until you get the command to complete the process formatting ^ XZ.
2. ZPL ll has a lot of new commands.
Syntax
Considering a programming language without examples makes no sense. Therefore, the program code for printing a simple label is given to allow to look at the syntax.
1 2 3 4 5 6 7 8 9 10 11 12 13 14 15 16 17 18 19 20 21 22 23 24 25 26 27 28 29 30 31 32 33 34 35 36 37 38 39 |
^XA ^FX Top section with company logo, name and address. ^CF0,60 ^FO55,55^GC100^FS ^FO75,55^GC100^FS ^FO75,75^GC100^FS ^FO55,75^GC100^FS ^FO88,88^GC50,50^FS ^FO220,50^FDLorem Ipsum, Inc.^FS ^CF0,40 ^FO220,100^FD1000 Shipping Lane^FS ^FO220,135^FDShelbyville TN 38102^FS ^FO220,170^FDEURO UNION (EU)^FS ^FO50,250^GB700,1,3^FS ^FX Second section with recipient address and permit information. ^CFA,30 ^FO50,300^FDKarl Marks^FS ^FO50,340^FD100 Main Street^FS ^FO50,380^FDEURO UNION (EU)^FS ^CFA,15 ^FO50,450^GB700,1,3^FS ^FX Third section with barcode. ^BY5,2,120 ^FO175,500^BC^FD1234567890^FS ^FX Fourth section (the two boxes on the bottom). ^FO50,700^GB700,250,3^FS ^FO400,700^GB1,250,3^FS ^CF0,40 ^FO100,760^FDShipping Ctr. Y74H-1^FS ^FO100,800^FDREF1 F99L17^FS ^FO100,840^FDREF2 YUH88^FS ^CF0,190 ^FO485,765^FDAA^FS ^XZ |
Now, we get the ticket for the shipping control:
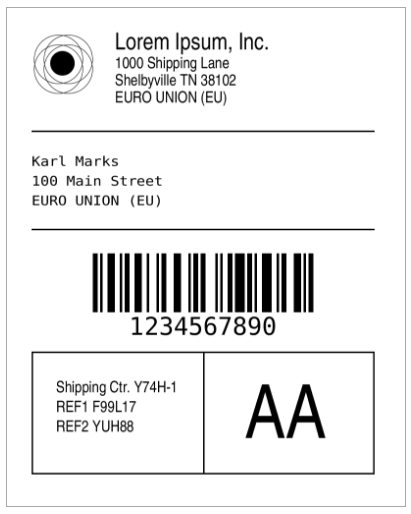
As you can see, the code begins with the tag (command) ^ XA and ends with the tag ^ XZ. The code is divided by the comments into four sections for convenience of consideration.
1) The first section displays the company logo and its legal data:
1 2 3 4 5 6 7 8 9 10 11 12 13 |
^FX Top section with company logo, name and address. ^CF0,60 ^FO55,55^GC100^FS ^FO75,55^GC100^FS ^FO75,75^GC100^FS ^FO55,75^GC100^FS ^FO88,88^GC50,50^FS ^FO220,50^FDLorem Ipsum, Inc.^FS ^CF0,40 ^FO220,100^FD1000 Shipping Lane^FS ^FO220,135^FDShelbyville TN 38102^FS ^FO220,170^FDEURO UNION (EU)^FS ^FO50,250^GB700,1,3^FS |
It is clear that tag ^ FX means a comment.
^CF x, y, z – Default font settings: font, height and width.
^FO x,y - left and top indentation.
^FS – end of line.
Next, draw a logo from four circles:
^GC x,y – draw a circle. Diameter – x, line thickness – y.
Legal data:
^FD – data field.
2) In the second section we will not see new tags.
3) In the third section we add a barcode:
1 2 3 |
^FX Third section with barcode. ^BY5,2,120 ^FO175,500^BC^FD1234567890^FS |
Here:
^BY x,y,z – width, width of bar, height.
4) In the fourth section another tag appeares:
^GB x,y,z – rectangle (box). Width, height, thickness of the frame.
By using a small set of tags, we described the entire printed page. The process is rather simple. You only need to set the distance in points. All the measurements are in points.
Summing up, in this article we have considered a part of the ZPL commands to meet a user with the main point of the language.
As on the Internet there are many online interpreters of the ZPL code, you can always test it visually.