How to upload report into Online Designer and download edited report
One of the first questions that faces Online Designer users is how to organize downloading reports from a local computer? Today we will consider uploading from the local computer to Online Designer and downloading the modified report using the example of the ASP.Net MVC application.
Create an ASP.Net MVC project. We will need the following libraries:

Open the controller HomeController.cs. Add the missing libraries to the uses section:
1 2 3 4 5 6 7 8 9 10 11 12 13 14 15 16 17 18 |
using System; using System.Collections.Generic; using System.Linq; using System.Web; using System.Web.Mvc; using System.Web.UI; using System.Runtime.Caching; using System.Text; using System.IO; using FastReport; using FastReport.Web; using FastReport.Utils; using System.Web.UI.WebControls; using FastReport.Export.Html; using FastReport.Data; using System.Net.Http.Headers; using FastReport.Export.Image; using System.Net.Http; |
We will display OnlineDesigner in the Index method. But, first we create a web report object and a cache for storing the report file. I use the cache in order to avoid saving the file on the server:
1 2 3 4 5 6 7 8 9 10 11 12 13 14 15 16 17 18 19 20 21 22 23 24 25 26 27 28 29 30 31 32 33 34 |
private WebReport webReport = new WebReport(); //Report object MemoryCache cache = MemoryCache.Default; //Cache public ActionResult Index(HttpPostedFileBase upload) { webReport.Width = Unit.Percentage(100); webReport.Height = Unit.Percentage(100); string report_path = GetReportPath(); // The path to the folder with reports System.Data.DataSet dataSet = new System.Data.DataSet(); dataSet.ReadXml(report_path + "nwind.xml"); //Read database webReport.Report.RegisterData(dataSet, "NorthWind"); // Register the data in the report // If you do not use the cache, then load the report from the server if (System.IO.File.Exists(report_path + "report.frx")) { webReport.Report.Load(report_path + "report.frx"); } // If you are using a cache, then load a report from it if (cache.Contains("1")) { webReport.Report.Load(cache["1"] as Stream); } // Online-Designer settings webReport.DesignReport = true; webReport.DesignScriptCode = false; webReport.Debug = true; webReport.DesignerPath = "~/WebReportDesigner/index.html"; webReport.DesignerSaveCallBack = "~/Home/SaveDesignedReport"; webReport.ID = "DesignReport"; ViewBag.WebReport = webReport; //Pass the report to View return View(); } |
Method for obtaining the path to the reports:
1 2 3 4 |
private string GetReportPath() { return this.Server.MapPath("~/App_Data/"); } |
Next, we add the method of uploading the file:
1 2 3 4 5 6 7 8 9 10 11 12 13 14 15 16 |
[HttpPost] // Attribute indicates that the method is processing the Post request public ActionResult Upload(HttpPostedFileBase upload) { if (upload != null) { // Get file name string fileName = System.IO.Path.GetFileName(upload.FileName); // Save report in cache cache.Add("1", upload.InputStream, DateTimeOffset.Now.AddMinutes(1)); // If you save to a file on the server upload.SaveAs(Server.MapPath("~/App_Data/report.frx")); } return RedirectToAction("Index"); } |
Note the DateTimeOffset.Now.AddMinutes (1) parameter. It specifies the cache lifetime.
Now we need a method of saving the report in Online Designer:
1 2 3 4 5 6 7 8 9 10 11 12 13 14 15 16 17 18 19 20 21 22 23 24 25 26 27 |
[HttpPost] // call-back for save the designed report public ActionResult SaveDesignedReport(string reportID, string reportUUID) { ViewBag.Message = String.Format("Confirmed {0} {1}", reportID, reportUUID); if (reportID == "DesignReport") { //Save report in cache cache.Set("1", Request.InputStream, DateTimeOffset.Now.AddMinutes(10)); // If the report is saved to the server /*************************************/ Stream reportForSave = Request.InputStream; string pathToSave = Server.MapPath("~/App_Data/DesignedReports/test.frx"); using (FileStream file = new FileStream(pathToSave, FileMode.Create)) { reportForSave.CopyTo(file); } /*************************************/ } return View(); } |
We create a single view SaveDesignedReport.cshtml for this method:
It remains to implement the method of downloading the report file:
1 2 3 4 5 6 7 8 |
public FileResult GetFile() { Stream str = cache["1"] as Stream; // Prepare a file for download from the cache return File(str, "application/octet-stream","test.frx"); // If you used saving report to the file on the server return File(Server.MapPath("~/App_Data/DesignedReports/test.frx"), "application/octet-stream", "test.frx"); } |
Now consider the view for the Index page (Home-> Index.cshtml):
1 2 3 4 5 6 7 8 9 10 11 12 13 14 15 16 |
@{ ViewBag.Title = "Home Page"; } <h3>Select file</h3> @using (Html.BeginForm("Upload", "Home", FormMethod.Post, new { enctype = "multipart/form-data" })) { <input type="file" name="upload" /> <input type="submit" value="Upload" /> } <div style="float:right"> @using (Html.BeginForm("GetFile", "Home", FormMethod.Get)) { <input id="dwn" type="submit" value="Download designed report" /> } </div> @ViewBag.WebReport.GetHtml() |
At the top we display the title of the page. Next, use the BeginForm helper to create a form with a file select button. The parameters specify the name of the handler method - "Upload", the controller name is "Home", the processing method is FormMethod.Post, the data encoding method is - enctype = "multipart/form-data".
Next, insert the file download field and the button.
On the right side of the page, we'll place one more button on which the edited report will be downloaded. For it, we also create a form using the BeginForm helper.
In the last line of code, we display the report received from the controller.
It is necessary to connect the scripts in the file _Layout.cshtml:
Now you need to make changes to the two web configs. The files are called the same, but they are located in different folders. The first one is located in the Views folder. We add to it:
1 2 3 4 5 |
<namespaces> … <add namespace="FastReport" /> <add namespace="FastReport.Web" /> </namespaces> |
The second file is located at the root of the project. In it we add a handler:
1 2 3 4 5 6 |
<system.webServer> <handlers> … <add name="FastReportHandler" path="FastReport.Export.axd" verb="*" type="FastReport.Web.Handlers.WebExport"/> </handlers> </system.webServer> |
Run our application.
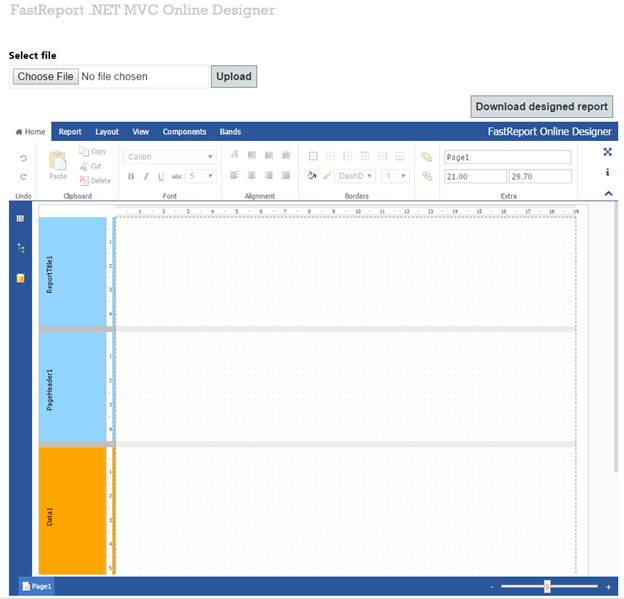
We see OnlineDesigner with an empty report. Download the report from the local computer using the "Select file" button. From the dialog box, select the file and click the Upload button:
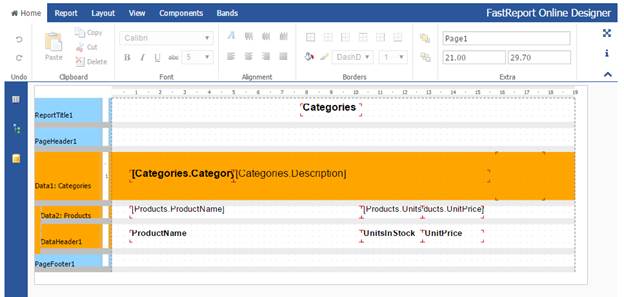
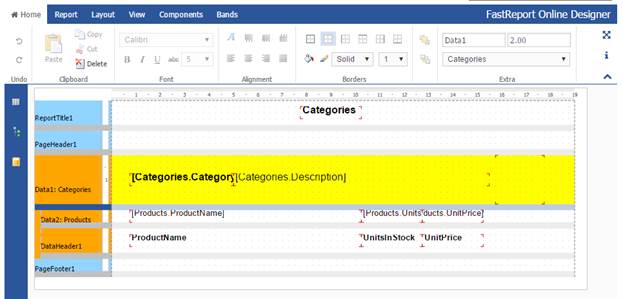
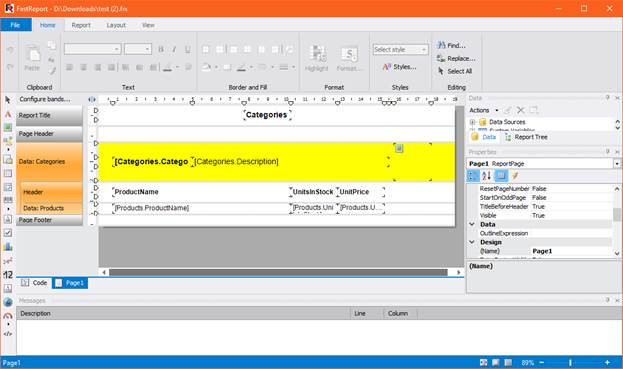
The report template was loaded. Let's change the background color in the data band. On the "Report" tab, we click the "Save" button:
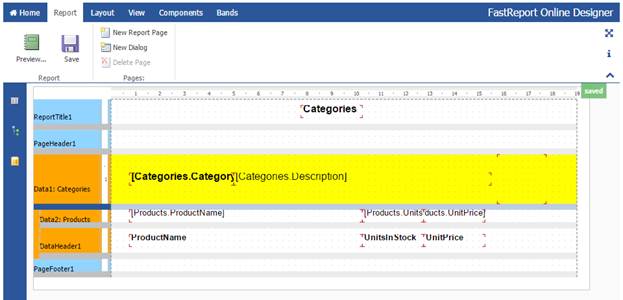
The SaveDesignedReport method works and we see the green alert on the right:
Now click the «Download designed report» button:

Browser download our report. Open it with Report Designer:
And get our report, edited with Online Designer.