Using external controls to manage report properties
This article aims to explicate the concept of work with a report via the Web form controls in the project ASP .Net MVC.
So, the task is to create a Web application, that will allow to:
1) upload a Web report;
2) export the report in one of three formats;
3) display / hide the Web toolbar of the report;
4) customize the style of the toolbar buttons;
5) run the report in the Online Designer.
Let us proceed. To begin, do some preparatory work to start in MVC web application report. Add a reference to the following libraries: FastReport and FastReport.Web.
Now you need to edit the file " _Layout.cshtml from the folder Views-> Shared". Add scripts and styles to the header:
Add the namespaces to the "Web.config" file from the "Views" folder:
1 2 3 4 |
<namespaces> <add namespace="FastReport" /> <add namespace="FastReport.Web" /> </namespaces> |
At the root of the project there is another "Web.config". Add the handler to it immediately after the modules section:
1 2 3 4 5 6 |
<modules> … </modules> <handlers> <add name="FastReportHandler" path="FastReport.Export.axd" verb="*" type="FastReport.Web.Handlers.WebExport"/> </handlers> |
Add logic of the report in "HomeController".
We will upload the report and transmit it to twist in the Index method.
1 2 3 4 5 6 7 8 |
public ActionResult Index() { SetReport(); webReport.Width = Unit.Percentage(100); webReport.Height = Unit.Percentage(100); ViewBag.WebReport = webReport; return View(); } |
I have downloaded the report in a separate method, which will be discussed below. Now set the width and height of the web report 100%. With the help of "ViewBag" pass on the report to overview it. Then, return the presentation "Index".
To use a report object in different methods I have created a global variable – an instance of the WebReport object.
1 |
public WebReport webReport = new WebReport();
|
1) Let us consider a Web report loading:
1 2 3 4 5 6 7 8 |
private void SetReport() { string report_path = GetReportPath(); System.Data.DataSet dataSet = new System.Data.DataSet(); dataSet.ReadXml(report_path + "nwind.xml"); webReport.Report.RegisterData(dataSet, "NorthWind"); webReport.Report.Load(report_path + "Master-Detail.frx"); } |
Set the path to the folder with reports. For my convenience, I have created a single method of assigning a variable of the path to the reports.
Next, create an instance of the "DataSet" and load XML database into it. Then, register the data source in the report object. Finally, load the report template into the WebReport object.
The method specifies the path of the folder with reports:
1 2 3 4 |
private string GetReportPath() { return this.Server.MapPath("~/App_Data/"); } |
2) Add one more method of selecting report exports before we move on to the "View":
1 2 3 4 5 6 7 8 9 10 11 12 13 14 15 |
public void ReportExport(string type) { SetReport(); switch (type) { case "pdf": webReport.ExportPdf(); break; case "csv": webReport.ExportCsv(); break; default: webReport.ExportWord2007(); break; } |
Here we load a report. Depending on the value of the type parameter, we perform one of three types of exports.
Now open the view "Index".
Add the drop-down list with three export options to the form:
1 2 3 4 5 6 7 8 9 10 11 |
@using (Html.BeginForm("ReportExport", "Home")) { @Html.DropDownList("Type", new List<SelectListItem>() { new SelectListItem(){ Text= "PDF", Value = "pdf"}, new SelectListItem(){ Text= "CSV", Value = "csv"}, new SelectListItem(){ Text= "Word", Value = "doc"}, }, "Select export type") <input id="pdf" type="submit" value="Export" /> } @ViewBag.WebReport.GetHtml() |
Here we have used an html helper to create a form, that refers to the controller "Home" and action (method) "ReportExport". As you remember, we have already established such a method in the controller. Inside the form we create a DropDownList control, and fill it with values. Of course, it was possible to create a data model. However, since the list consists of only three elements, I filled it right in the presentation. After the drop - down list is opened,there a button of the submit type will appear, which will be updated on the web page.
As you remember, the ReportExport method takes a parameter "type" - a value from the drop - down list. The report will be exported in an appropriate format depending on the selected value.
3) Now we will implement the hiding of the report toolbar. The View code will look like this:
1 2 3 4 |
@using (Html.BeginForm("Index", "Home")) { @Html.CheckBox("Toolbar", true, new { @onchange = "this.form.submit()" }) Toolbar } |
As in the previous example, we create a form. However, this time we specify the action "Index", where we have displayed the report. Inside the form we have created a CheckBox element. Its value we will transfer to the "Index" method. This time I decided not to add another button to refresh the page. I used the the event "onchange", which has the function of a sending form "this.form.submit ()". Now, the page will be updated when the checkbox value changes.
By analogy with the report export, we have to pass a parameter to the method. In this case, it is a toolbar. The string equivalent of the Boolean functions will be transferred. We proceed to our control:
1 2 3 4 5 6 7 8 9 10 11 12 13 |
public ActionResult Index(string toolbar) { SetReport(); webReport.Width = Unit.Percentage(100); webReport.Height = Unit.Percentage(100); if (toolbar == "true") webReport.ShowToolbar = true; else webReport.ShowToolbar = false; ViewBag.WebReport = webReport; return View(); } |
We have added a parameter and a condition. In dependence to the paramenter of the toolbar we decide whether to enable or disable it.
4) Now let us move to the creation of controls, with the help of which we can choose the icon style. We will add four more RadioButton elements to the previous example with the form:
1 2 3 4 5 6 7 8 9 10 11 12 13 14 15 16 17 18 19 20 21 22 |
@using (Html.BeginForm("Index", "Home")) { <table> <tr> <td> @Html.CheckBox("Toolbar", true, new { @onchange = "this.form.submit()" }) Toolbar </td> <tr> <tr> <td>Black Buttons:</td><td> @Html.RadioButton("Radio", "Black Buttons", true, new { style = "width: 13px;", @onchange = "this.form.submit()" })</td> </tr> <tr> <td>Green Buttons:</td><td> @Html.RadioButton("Radio", "Green Buttons", false, new { style = "width: 13px;", @onchange = "this.form.submit()" })</td> </tr> <tr> <td>Blue Buttons:</td><td>@Html.RadioButton("Radio", "Blue Buttons", false, new { style = "width: 13px;", @onchange = "this.form.submit()" })</td> </tr> <tr> <td>Red Buttons:</td><td>@Html.RadioButton("Radio", "Red Buttons", false, new { style = "width: 13px;", @onchange = "this.form.submit()" })</td> </tr> </table> @ViewBag.WebReport.GetHtml() |
To improve the appearance I put the items into a table. Let us give consideration to one of the RadioButton components:
Html.RadioButton("Radio", "Black Buttons", true, new { style = "width: 13px;", @onchange = "this.form.submit()" })
Here is the name of the control - "Radio". That is how one more parameter in the action movie "Index" will be called. Next parameter - "Black Buttons", when black buttons appear on the toolbar. The next value indicates whether a selected radio button will be marked by default or not. The last parameter is the object "HtmlAttributes". Here you can choose any of the available attributes for the tag <input type = "radio" />. I took advantage of this and specified the width of the control and the "onchange" event by analogy with the previous element "checkbox".
1 2 3 4 5 6 7 8 9 10 11 12 13 14 15 16 17 18 19 20 21 22 23 24 25 26 27 28 |
public ActionResult Index(string toolbar, string radio) { SetReport(); webReport.Width = Unit.Percentage(100); webReport.Height = Unit.Percentage(100); if (toolbar == "true") webReport.ShowToolbar = true; else webReport.ShowToolbar = false; switch (radio) { case "Red Buttons": webReport.ToolbarIconsStyle = ToolbarIconsStyle.Red; break; case "Green Buttons": webReport.ToolbarIconsStyle = ToolbarIconsStyle.Green; break; case "Blue Buttons": webReport.ToolbarIconsStyle = ToolbarIconsStyle.Blue; break; default: webReport.ToolbarIconsStyle = ToolbarIconsStyle.Black; break; } ViewBag.WebReport = webReport; return View(); } |
Now add another one parameter - "radio". I have used the structure "Switch" to assign a desired style, depending on the radio.
Let us allocate the processing of parameters "radio" and "toolbar" into separate methods.
1 2 3 4 5 6 7 8 9 10 11 12 13 14 15 16 17 18 19 20 21 22 23 24 25 26 |
public void ShowToolbar(string toolbar) { if (toolbar == "true") webReport.ShowToolbar = true; else webReport.ShowToolbar = false; } public void ToolbarStyle(string radio) { switch (radio) { case "Red Buttons": webReport.ToolbarIconsStyle = ToolbarIconsStyle.Red; break; case "Green Buttons": webReport.ToolbarIconsStyle = ToolbarIconsStyle.Green; break; case "Blue Buttons": webReport.ToolbarIconsStyle = ToolbarIconsStyle.Blue; break; default: webReport.ToolbarIconsStyle = ToolbarIconsStyle.Black; break; } } |
The "Index" has also changed:
1 2 3 4 5 6 7 8 9 10 |
public ActionResult Index(string toolbar, string radio) { SetReport(); webReport.Width = Unit.Percentage(100); webReport.Height = Unit.Percentage(100); ShowToolbar(toolbar); ToolbarStyle(radio); ViewBag.WebReport = webReport; return View(); } |
5) The only we need is to realize conceived function - to run the report in Online Designer. It must be mentioned, that you need to get the assembly "OnlineDesigner" from the developer's website and include it in the project. Just unzip it and add the whole WebReportDesigner folder to the project root.
Add a button and a hidden field to the form from the previous example:
The form will be submitted by pressing the button. Notice that the attribute value is determined through "ViewBag". We pass the button value from the control. It will be explained later why it has been done. The onclick event has been assigned for the button. Now I assign a value "Hidden" to the element in it. Please note, that due to "ViewBag" I get the value of the Web report. Thus, if the page shows the Report Designer, the value of the hidden field is "true", otherwise it is "false".
1 2 3 4 5 6 7 8 9 10 11 12 13 14 15 16 17 18 19 20 21 22 23 24 25 26 27 28 29 30 31 32 33 34 35 36 37 38 39 40 41 42 43 44 45 |
@{ ViewBag.Title = "Home Page"; } <div style="float:left"> @using (Html.BeginForm("ReportExport", "Home")) { @Html.DropDownList("Type", new List<SelectListItem>() { new SelectListItem(){ Text= "PDF", Value = "pdf"}, new SelectListItem(){ Text= "CSV", Value = "csv"}, new SelectListItem(){ Text= "Word", Value = "doc"}, }, "Select export type") <input id="pdf" type="submit" value="Export" /> } <div align="left"> @using (Html.BeginForm("Index", "Home")) { <table> <tr> <td> @Html.CheckBox("Toolbar", true, new { @onchange = "this.form.submit()" }) Toolbar </td> <td> <input id="dsg" type="submit" value="@ViewBag.Result" onclick="document.getElementById('hid').value='@ViewBag.WebReport.DesignReport.ToString()'"/> <input id="hid" type="hidden" name="dsg"> </td> <tr> <tr> <td>Black Buttons:</td><td> @Html.RadioButton("Radio", "Black Buttons", true, new { style = "width: 13px;", @onchange = "this.form.submit()" })</td> </tr> <tr> <td>Green Buttons:</td><td> @Html.RadioButton("Radio", "Green Buttons", false, new { style = "width: 13px;", @onchange = "this.form.submit()" })</td> </tr> <tr> <td>Blue Buttons:</td><td>@Html.RadioButton("Radio", "Blue Buttons", false, new { style = "width: 13px;", @onchange = "this.form.submit()" })</td> </tr> <tr> <td>Red Buttons:</td><td>@Html.RadioButton("Radio", "Red Buttons", false, new { style = "width: 13px;", @onchange = "this.form.submit()" })</td> </tr> </table> } </div> </div> @ViewBag.WebReport.GetHtml() |
Now we proceed to the controller.
1 2 3 4 5 6 7 8 9 10 11 12 13 14 15 16 17 18 19 20 21 22 23 24 25 26 |
public ActionResult Index(string toolbar, string radio, string dsg) { SetReport(); webReport.Width = Unit.Percentage(100); webReport.Height = Unit.Percentage(100); ShowToolbar(toolbar); ToolbarStyle(radio); ViewBag.Result = ShowDesigner(dsg); ViewBag.WebReport = webReport; return View(); } public string ShowDesigner(string dsg) { if (dsg == "False") { webReport.DesignReport = true; return "Show Report"; } else if (dsg == "True") { webReport.DesignReport = false; return "Show Designer"; } return "Show Designer"; } |
As you can see, another parameter has been added in the method "Index". Its name is the name of a hidden item in the View. Also, the following line has been added: «ViewBag.Result = ShowDesigner (dsg);».
I gave the button name to the view in this line. A new method "ShowDesigner" enables or disables report designer and returns the name of the button.
Now launch the application:
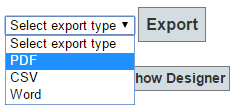
Here is a drop-down list with three types of exports:
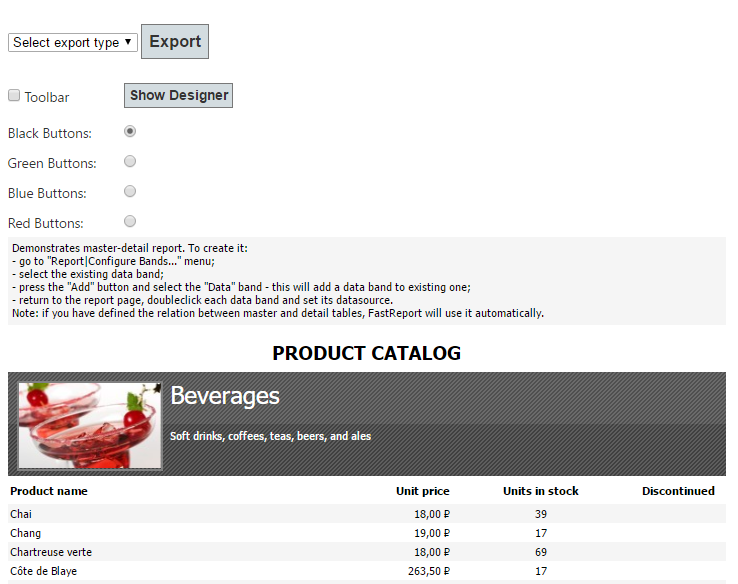
Let us disable the toolbar:
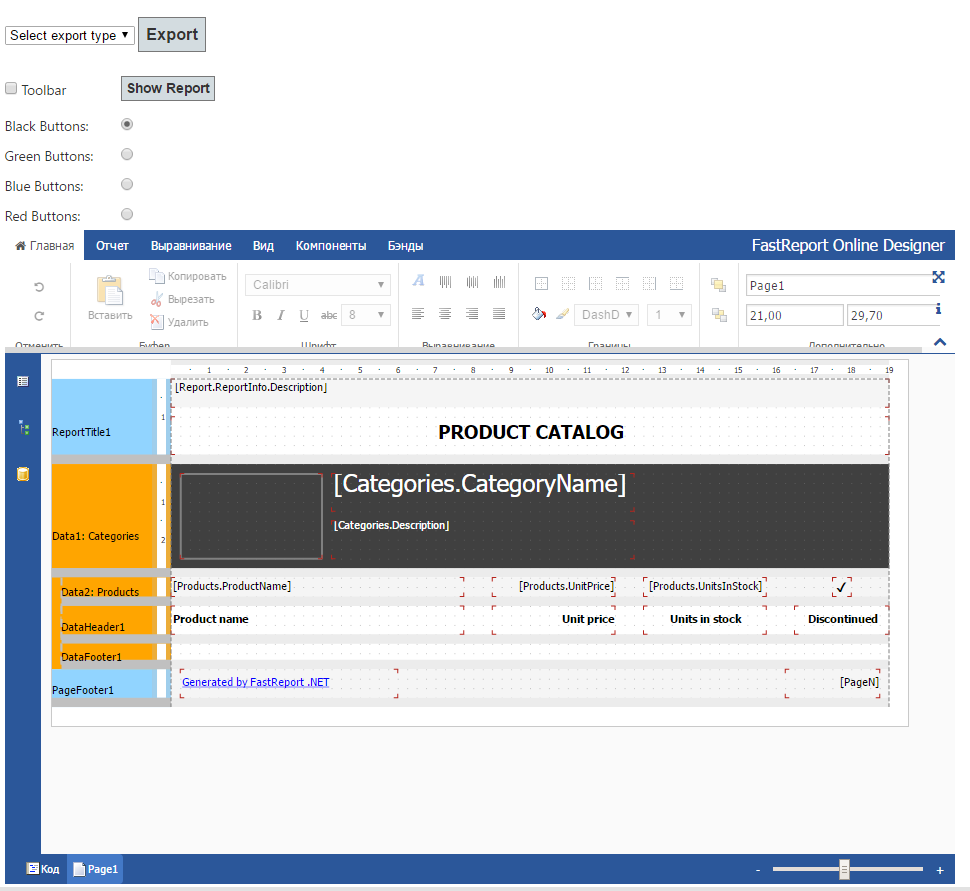
Now we enable the Online Report Designer:
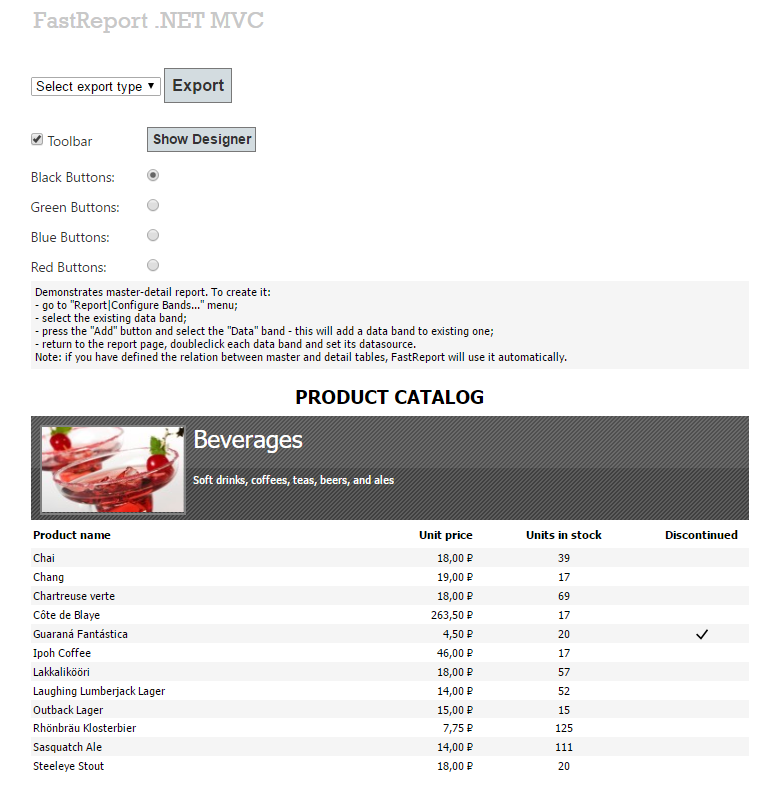
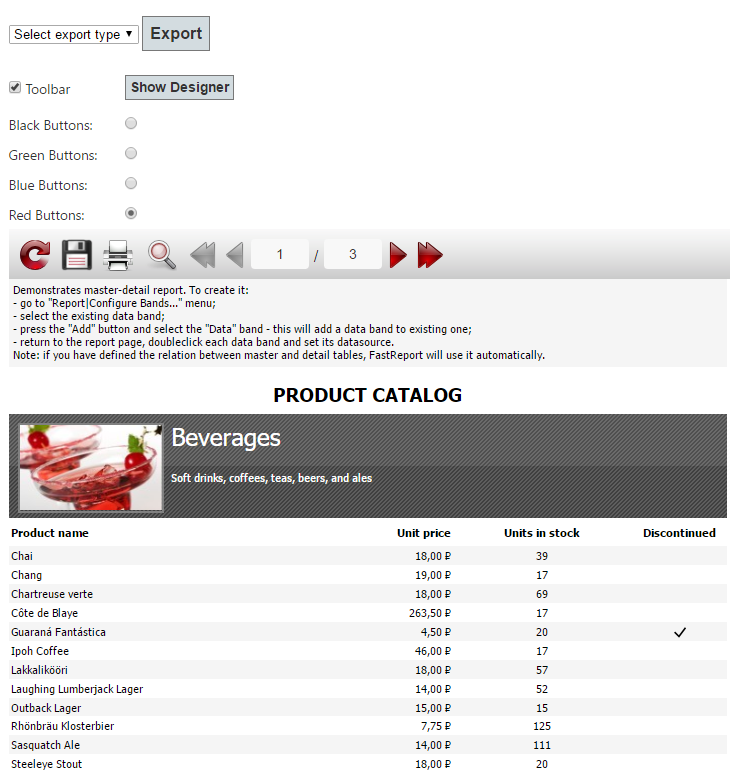
Display the report and enable the toolbar. We can choose any style for the buttons on the toolbar:
 In this the external controls have been created and examined, by means of which we can manage properties of a WebReport object in ASP .Net MVC application.