Creating report from user application in FastReport.NET
At the new work place I got to deal with the report generator FastReport .NET. Previously, I had to deal with other reporting systems, for example, Crystal Reports and Microsoft Reporting Services. However, FastReport pleasantly surprised me.
It's a really powerful tool with broad functionality. One of my favorite features of FastReport .Net is the ability to create reports directly from the user application code. In this article I want to look at the example of this feature. It comes in handy when you do not need a bunch of files that come with the exe-file. In addition, you can fully control the creation of self-report, changing the appearance of the object of the report, depending on the application logic.
First of all, I will show the difference between building a report from the code of the user application from the classic development of a report template in a special designer.
Usually, the report generator provides a special designer to design a report template. This may be the component IDE, or just external program. Developer places components on the page of the report and specifies their properties. This is similar to designing a form in application Windows Forms application.
In addition to such classic ways to create a report template, FastReport allows you to create a template using the same components but with the help of code in the application. You can also create a report object, add components to it, and configure the data source. With some practice, the creation of a report from the code takes a little longer than in the visual editor. Interestingly, with the result that such a report template can be viewed in the same visual editor (the designer) and save to file.
Let's have a look at the example.
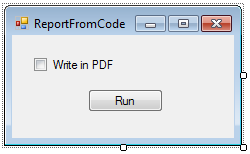
Create a Windows Forms application in the language C # (of course FastReport .NET should be installed at this point).
Place a button on the form, which will launch our report. Looking ahead, I will say that we will not only show the report in preview mode, but also make its exports to PDF. Therefore add CheckBox:
Create a button click event handler. Here is the entire code of the application.
First of all, add a reference to the FastReport.dll (which is in the pack FastReport .Net).
Also, add the library FastReport, FastReport.Utils and FastReport.Data in using.
Create an instance of Report:
1 2 3 4 5 |
private void RunBtn_Click(object sender, EventArgs e) { //Create instance of class Report Report report = new Report(); } |
Our report will display data from the database, so you need to create a data source:
1 2 3 |
//load data DataSet ds = new DataSet(); ds.ReadXml(AppFolder + "\\nwind.xml"); |
I took the database from the delivery of FastReport .Net from the folder Reports.
Now you need to register the data source in the report:
1 2 |
//Register data source report.RegisterData(ds); |
To use the table of the registered data source, you need to enable it:
1 2 |
//Enable data table report.GetDataSource("Products").Enabled = true; |
The preparatory work can be considered done. Moving on to creation of the report template. Create the report page:
1 2 |
//Add report page ReportPage page = new ReportPage(); |
And add it to the report:
1 |
report.Pages.Add(page);
|
All objects of the report need to be given unique names. You can come up with their own, and assign the property Name, or you can use a function that generates a unique name:
1 |
page.CreateUniqueName();
|
So, the report page is ready for filling. Create a band "Group Header":
1 2 |
//Create GroupHeader band GroupHeaderBand group = new GroupHeaderBand(); |
Add the created band to the page:
1 2 |
page.Bands.Add(group); group.CreateUniqueName(); |
Set the band height:
1 |
group.Height = Units.Centimeters * 1;
|
Grouping condition and sort order:
1 2 |
group.Condition = "[Products.ProductName].Substring(0,1)"; group.SortOrder = FastReport.SortOrder.Ascending; |
Now we need to fill the created band with the data. To do this, create a text object with reference to the field from the data source:
1 2 |
// create group text TextObject groupTxt = new TextObject(); |
Important Parent parameter indicates the band, where will be placed text object:
1 2 |
groupTxt.Parent = group; groupTxt.CreateUniqueName(); |
Set the size and the bounds of the text objects:
1 |
groupTxt.Bounds = new RectangleF(0, 0, Units.Centimeters * 10, Units.Centimeters * 1);
|
And the text:
1 |
groupTxt.Font = new Font("Arial", 14, FontStyle.Bold);
|
The other settings relate to the appearance of the text:
1 2 3 |
groupTxt.Text = "[[Products.ProductName].Substring(0,1)]"; groupTxt.VertAlign = VertAlign.Center; groupTxt.Fill = new LinearGradientFill(Color.LightGoldenrodYellow, Color.Gold, 90, 0.5f, 1); |
Now the most interesting part is the creation of the band "data":
1 2 |
// create data band DataBand data = new DataBand(); |
Assign the data band for the group:
1 2 |
group.Data = data; data.CreateUniqueName(); |
Assign the data source for the band "data":
data.DataSource = report.GetDataSource("Products");
data.Height = Units.Centimeters * 0.5f;
1 2 |
group.Data = data; data.CreateUniqueName(); |
Here you can set the filter band with the property Filter. Now fill the band with the text object:
The group footer is made for a specific group instance. It's very convenient because it will not allow to get confused if there are multiple group headers. So, let's create the group footer:
1 2 3 4 |
// create group footer group.GroupFooter = new GroupFooterBand(); group.GroupFooter.CreateUniqueName(); group.GroupFooter.Height = Units.Centimeters * 1; |
Add a total to the group footer. It will display the count of products in the group:
1 2 3 |
// create total Total groupTotal = new Total(); groupTotal.Name = "TotalRows"; |
Set the type calculation, the band for which the calculations are performed, and the band, which will display the results. Since we define the count of items we do not need to specify a particular field for calculations (done using groupTotal.Expression).
1 2 3 |
groupTotal.TotalType = TotalType.Count; groupTotal.Evaluator = data; groupTotal.PrintOn = group.GroupFooter; |
We need to add the created total to the totals dictionary of the report. To register it:
1 |
report.Dictionary.Totals.Add(groupTotal);
|
Like any expression to be displayed, the result is displayed through the text object:
1 2 3 4 5 6 7 8 |
// show total in the group footer TextObject totalText = new TextObject(); totalText.Parent = group.GroupFooter; totalText.CreateUniqueName(); totalText.Bounds = new RectangleF(0, 0, Units.Centimeters * 10, Units.Centimeters * 0.5f); totalText.Text = "Rows: [TotalRows]"; totalText.HorzAlign = HorzAlign.Right; totalText.Border.Lines = BorderLines.Top; |
That's all. The report is ready. Now we can display it, or run in the designer. And you can immediately export it in the desired data format. Let's use a CheckBox, which we added to the form:
If the CheckBox is checked, you will get the dialog box to save the pdf file. Otherwise, the report will be launched in preview mode. Here it should be noted that it is possible to make export even without displaying the dialog box. Like some sort of “quiet mode”. Then export will look like this:
1 |
export.Export(report, @"C:\Temp\ReportFromCode.pdf");
|
where the first option - instance of the report and the second - the resulting file.
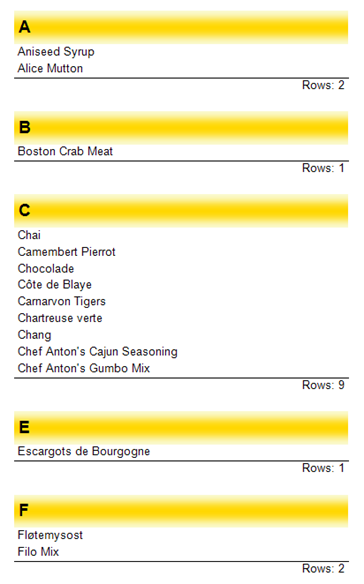
What we've got the result:
1 2 3 4 5 6 7 8 9 10 11 12 13 14 15 16 17 18 19 20 21 22 23 24 25 26 27 28 29 30 31 32 33 34 35 36 37 38 39 40 41 42 43 44 45 46 47 48 49 50 51 52 53 54 55 56 57 58 59 60 61 62 63 64 65 66 67 68 69 70 71 72 73 74 75 76 77 78 79 80 81 82 |
//Create instance of class Report Report report = new Report(); //load data DataSet ds = new DataSet(); ds.ReadXml(AppFolder + "\\nwind.xml"); //Register data source report.RegisterData(ds); //Enable data table report.GetDataSource("Products").Enabled = true; //Add report page ReportPage page = new ReportPage(); report.Pages.Add(page); page.CreateUniqueName(); //Create GroupHeader band GroupHeaderBand group = new GroupHeaderBand(); page.Bands.Add(group); group.CreateUniqueName(); group.Height = Units.Centimeters * 1; group.Condition = "[Products.ProductName].Substring(0,1)"; group.SortOrder = FastReport.SortOrder.Ascending; // create group text TextObject groupTxt = new TextObject(); groupTxt.Parent = group; groupTxt.CreateUniqueName(); groupTxt.Bounds = new RectangleF(0, 0, Units.Centimeters * 10, Units.Centimeters * 1); groupTxt.Text = "[[Products.ProductName].Substring(0,1)]"; groupTxt.Font = new Font("Arial", 14, FontStyle.Bold); groupTxt.VertAlign = VertAlign.Center; groupTxt.Fill = new LinearGradientFill(Color.LightGoldenrodYellow, Color.Gold, 90, 0.5f, 1); // create data band DataBand data = new DataBand(); group.Data = data; data.CreateUniqueName(); data.DataSource = report.GetDataSource("Products"); data.Height = Units.Centimeters * 0.5f; // create product name text TextObject productText = new TextObject(); productText.Parent = data; productText.CreateUniqueName(); productText.Bounds = new RectangleF(0, 0, Units.Centimeters * 10, Units.Centimeters * 0.5f); productText.Text = "[Products.ProductName]"; // create group footer group.GroupFooter = new GroupFooterBand(); group.GroupFooter.CreateUniqueName(); group.GroupFooter.Height = Units.Centimeters * 1; // create total Total groupTotal = new Total(); groupTotal.Name = "TotalRows"; groupTotal.TotalType = TotalType.Count; groupTotal.Evaluator = data; groupTotal.PrintOn = group.GroupFooter; report.Dictionary.Totals.Add(groupTotal); // show total in the group footer TextObject totalText = new TextObject(); totalText.Parent = group.GroupFooter; totalText.CreateUniqueName(); totalText.Bounds = new RectangleF(0, 0, Units.Centimeters * 10, Units.Centimeters * 0.5f); totalText.Text = "Rows: [TotalRows]"; totalText.HorzAlign = HorzAlign.Right; totalText.Border.Lines = BorderLines.Top; if (PDFCheckBox.Checked) { report.Prepare(); FastReport.Export.Pdf.PDFExport export = new FastReport.Export.Pdf.PDFExport(); export.Export(report); //export.Export(report, @"C:\Temp\ReportFromCode.pdf"); } else report.Show(); |
And the report itself:
Let's sum up. FastReport .Net surprised is with another interesting feature – creating a report from code. When might this be useful? If you do not want to produce a bunch of individual files with the report templates or want to hide a report template within the program in order to avoid damage or modify the template. It is also convenient to change the report template during the execution of your application. This gives great flexibility to the reports and the ability to use a single template, modifying it depending on the program logic.
I'm personally familiar and comfortable with using objects in the program code. Since the creation of the report is practically no different from writing basic code of application .