FastCube .NET

Biblioteca para criação de cubos pivot OLAP para .NET Core, Mono, ASP.NET, MVC e WinForms

v. 2025.2.2

FastCube permite analisar dados e construir tabelas de resumo (fatias de dados), bem como criar uma variedade de relatórios e gráficos de forma fácil e instantânea.

Cross table

Mesa cruzada

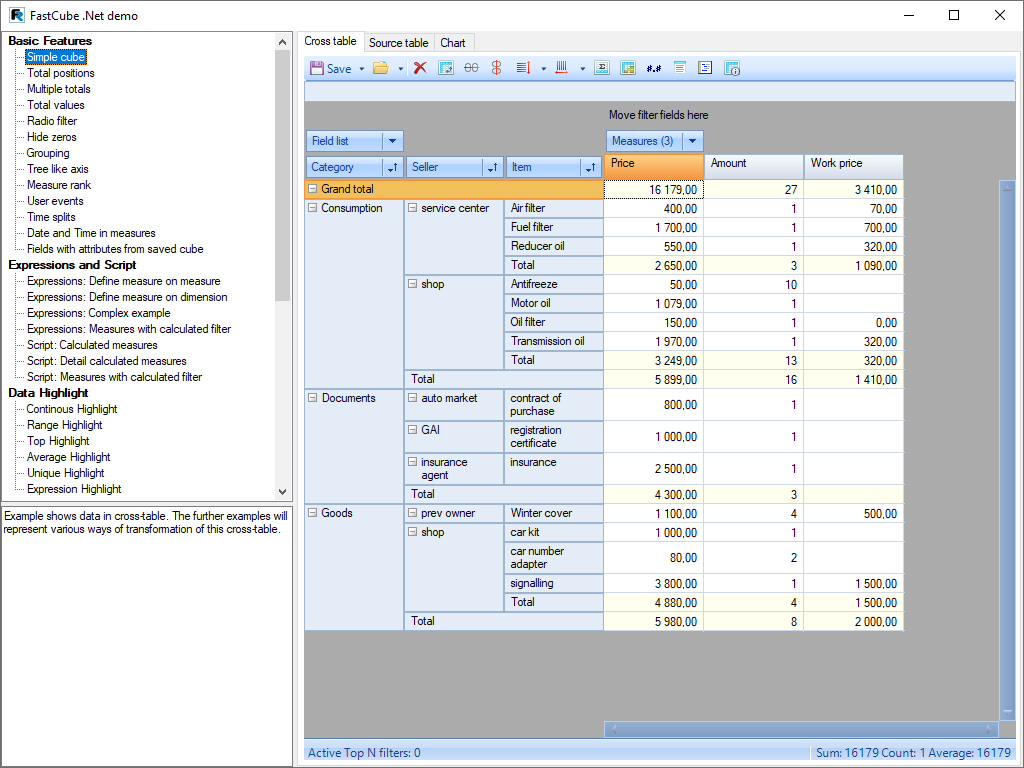
O FastCube .NET consiste em uma tabela cruzada-uma ferramenta interativa para apresentação e análise de dados. Nas partes superior e esquerda da tabela, há cabeçalhos de vários níveis preenchidos com os valores das dimensões. A parte central da tabela exibe os valores dos indicadores. A tabela cruzada consiste em muitas áreas: o cabeçalho da tabela cruzada, a área dos campos de filtro, os cabeçalhos vertical e horizontal das dimensões, o cabeçalho vertical e horizontal da tabela cruzada, a área de dados, a lista de Campos, a lista de filtros Top-N, A área de cálculos agregados para as células selecionadas e controle de escala.

Baixe o projeto no Knockout.js

Sorting FastCube .NET

Classificação

Os dados na tabela cruzada são exibidos em uma ordem estritamente classificada, independentemente de sua ordem original nos dados de origem. A ordem de classificação pode ser ascendente ou descendente. Para valores numéricos e baseados em tempo, a ordem significa sua ordem natural de sucessão. Para valores de string, a ordem alfabética de sucessão é aplicada.

Cada dimensão da tabela cruzada pode ter sua ordem de classificação de valores. Por padrão, a Classificação ascendente é aplicada. Você pode alterar a ordem de classificação de uma dimensão clicando duas vezes no cabeçalho da dimensão ou selecionando uma opção no menu de contexto.

Características e benefícios FastCube .NET

Incorporação na interface
Personalização e integração total na interface do seu aplicativo de negócios.
Filtro Global
Use um único cubo de dados para análise síncrona de acordo com vários critérios baseados em um filtro independente.
Código fonte
Este conjunto de componentes inclui códigos-fonte FastReport. Máxima comodidade para empresas que desejam adaptar o código às suas necessidades.

Seleção de dados condicionais

A tabela cruzada permite definir um estilo de exibição especial para determinados valores do indicador. Por exemplo, você pode destacar dados que se enquadram em um determinado intervalo ou vão além de seus limites. A regra de destaque permite processar valores de indicadores como valores, texto, datas ou NULL. Dependendo do tipo de Processamento, você pode aplicar diferentes opções de condição. Para processar valores, você pode usar as operações "maior que" e "menor que" e, para processamento de texto, as operações de inclusão ou exclusão de substring estão disponíveis.

O estilo de exibição da condição é definido no editor. Você pode escolher a variante de preenchimento do plano de fundo, a cor do texto e o estilo do texto. Para um preenchimento sólido, basta definir apenas a" cor de preenchimento 1", e para preenchimentos gradientes, você também precisa especificar a"cor de preenchimento 2". Além do realce de célula condicional, você pode aplicar um dos quatro tipos de realce a todos os valores. Nesse caso, cada célula será destacada dependendo do seu valor.

Conditional data selection

Apresentação de dados

Você pode exportar quaisquer fatias do cubo OLAP para os seguintes formatos: ODS, XLS, XML, HTML. Configurações de componentes flexíveis permitirão que você escolha recursos como: repetir valores de eixo para cada linha/coluna, selecionar o arquivo de saída para exibir a grade e muito mais.

Data presentation

Ultimate .NET

Este conjunto de componentes faz parte da solução definitiva, com a qual você pode criar seus projetos de negócios em todo o .NET moderno, ASP.NET, Blazor, WASM, WPF, WinForms, Avalonia UI, Mono e outras plataformas. Com sua equipe, você pode trabalhar tanto no desktop designer quanto diretamente do navegador. O pacote Ultimate também inclui componentes para visualização de dados, ou seja, gráficos de negócios com um conjunto de gráficos e produtos OLAP para processamento rápido de grandes conjuntos de dados.

Em quais plataformas ele é suportado?

Atualmente, a biblioteca trabalha com aplicações em WinForms, .NET Framework 4.7.2, ASP.NET Core, Mono Framework.

Artigos reenviados

28 de outubro de 2024

How to Set Up WSL 2 for Working with FastReport and FastCube

Software developers have long pondered the question, "How could we run Linux applications directly in Windows, without needing to use a separate virtual machine?" The WSL technology provides a potential answer to this question. The history of WSL began in 2016. At the time, the implementation involved running Linux binary executables using system calls within the Windows kernel. The first version also included emulation of the Linux kernel through a layer to translate system calls. The second version of WSL, released in 2019, featured full compatibility with system calls, a fully functional Linux kernel, support for GPUs, and support for Linux applications with a graphical user interface. In this article, we will explore how to set up WSL 2 for working with FastReport and FastCube components in Lazarus for Linux.     Installing and Setting Up Ubuntu 24.04 in WSL 2 Launch the Windows command line as an administrator. To display a list of all available Linux distributions, you need to enter the command in the Windows command line and press Enter: wsl --list --online or wsl -l -o To install Ubuntu 24.04, run the following command: wsl --install -d Ubuntu-24.04 After installing the distribution, you will be prompted to create a user account and password. To install Ubuntu 24.04, you only need to run a few commands. The Ubuntu 24.04 terminal is available from the Windows Start menu after installing the distribution. You can also launch the Linux kernel and enter the Ubuntu 24.04 terminal using the command from the Windows command line: wsl -d Ubuntu-24.04 After installing Ubuntu 24.04, you need to update the packages. To update the installed packages, run the following commands in the Ubuntu 24.04 terminal: $ sudo apt update && sudo apt upgrade && sudo apt dist-upgrade Enter the user password and press Enter. Wait for the request to agree to update the packages. Enter Y and confirm by pressing Enter. To install Nautilus, run this command in the terminal, and then enter the following command to directly launch Nautilus. $ sudo apt install nautilus -y $ nautilus After installation, the Nautilus file manager is available from the Windows Start menu.     Installing and Setting Up Linux 11 Starterkit in WSL 2 The WSL 2 subsystem allows you to use any Linux distribution by importing it from a tar file. Run the Windows command line as administrator. Run the command to download the Linux rootfs image to the root of the C\: drive: curl -o C:\alt-p11-rootfs-systemd-x86_64.tar.xz https://ftp.altlinux.org/pub/distributions/Linux/p11/images/cloud/x86_64/alt-p11-rootfs-systemd-x86_64.tar.xz To import the distribution into WSL 2, you need to run the command in the Windows command line: wsl --import Linux-11 C:\Linux-11 C:\alt-p11-rootfs-systemd-x86_64.tar.xz After importing, the Linux hard disk image file will be located in C:\Linux-11\ext4.vhdx. In the Windows command line, run the command to display a list of all registered distributions. And then run the newly imported Linux-11 distribution wsl -l -v wsl -d Linux-11 After starting Linux, a terminal will open. In the WSL configuration file for this distribution, you need to enable the use of systemd: # echo -e "[boot]\nsystemd=true\n" > /etc/wsl.conf In order for systemd to work, you need to stop and restart the distribution. To do this, use the following commands: # exit wsl -t Linux-11 wsl -d Linux-11 To update packages, you need to run the following command, then wait for the request to agree to update packages. Enter Y and confirm by pressing Enter. # apt-get update && apt-get dist-upgrade To ensure correct font display, you need to install the package:   # apt-get install fonts-ttf-ms To install and run Lazarus, you need to download the command-line utility make, then install the Free Pascal compiler and Lazarus IDE:   # apt-get install make # apt-get install fpc && apt-get install fpc-src # apt-get install lazarus Installation is complete. To launch Lazarus, run the command: # startlazarus     Installation of FastReport for Application Development in Linux Before starting the installation of FastReport and FastCube components, you need to download the installation packages. In the Linux-11 terminal, run the command to install wget, then confirm your actions by entering Y and pressing Enter.   # apt-get install wget Download the trial versions of the FastReport and FastCube packages:   # wget https://www.fast-report.com/public_download/fr.vcl/fast_report-trial.rpm # wget https://www.fast-report.com/public_download/fr.vcl/fast_cube-trial.rpm To install FastReport, run the command in the terminal:   # apt-get install ./fast_report*.rpm Before installing the FastReport packages, you need to compile the packages included with Lazarus and install additional libraries: # lazbuild --build-ide= --add-package /usr/lib64/lazarus/components/tachart/print/tachartprint.lpk # lazbuild --build-ide= --add-package /usr/lib64/lazarus/components/tachart/tachartlazaruspkg.lpk # apt-get install sqlite3 libsqlite3-devel After that, sequentially run the following commands to compile the FastReport packages:   # lazbuild --build-ide= --add-package /usr/share/FastReport*/Lpks/fs_lazarus.lpk # lazbuild --build-ide= --add-package /usr/share/FastReport*/Lpks/fr_lazarus.lpk # lazbuild --build-ide= --add-package /usr/share/FastReport*/Lpks/frxe_lazarus.lpk # lazbuild --build-ide= --add-package /usr/share/FastReport*/Lpks/frCS_lazarus.lpk # lazbuild --build-ide= --add-package /usr/share/FastReport*/Lpks/frxchartlazarus.lpk # lazbuild --build-ide= --add-package /usr/share/FastReport*/Lpks/frxlazdbf.lpk # lazbuild --build-ide= --add-package /usr/share/FastReport*/Lpks/frxSmartMemo_Laz.lpk # lazbuild --build-ide= --add-package /usr/share/FastReport*/Lpks/fqb*.lpk # lazbuild --build-ide= --add-package /usr/share/FastReport*/Lpks/frxlazsqlite.lpk # lazbuild --build-ide= --add-package /usr/share/FastReport*/Lpks/frxPDFlazarus.lpk     Installation of FastCube for Application Development in Linux Now let's move on to installing FastCube. Run the following command in the terminal: # apt-get install ./fast_cube*.rpm Then sequentially run the following commands to compile the FastCube packages:   # lazbuild --build-ide= --add-package /usr/share/FastCube*/Lpks/fcxScript.lpk # lazbuild --build-ide= --add-package /usr/share/FastCube*/Lpks/fcxLazarus.lpk # lazbuild --build-ide= --add-package /usr/share/FastCube*/Lpks/fcxCharting.lpk # lazbuild --build-ide= --add-package /usr/share/FastCube*/Lpks/fcxprint.lpk # lazbuild --build-ide= --add-package /usr/share/FastCube*/Lpks/fcxprintTee.lpk # lazbuild --build-ide= --add-package /usr/share/FastCube*/Lpks/fcxexport.lpk     Compiling and Running FastReport Demo in Lazarus At this point, the installation of FastReport and FastCube is complete. Finally, you can try to compile and run the FastReport Demo. To launch Lazarus, run the command in the terminal:   # startlazarus --skip-last-project In the Lazarus main menu, open the "Project" -> "Open Project..." option. In the dialog, select the project:   /usr/share/FastReport - Trial/Demos/FPC/FastReport/FastReportDemo.lpi After opening the project, press the F9 key to compile and run. This concludes the detailed setup of WSL 2 for working with FastReport and FastCube components in Lazarus for Linux. For any questions, please contact our technical support at support@fast-report.com. Enjoy using it!
Ler
26 de setembro de 2023

Installing FastReport and FastCube components in Lazarus

The release of the new version of Delphi in 2023.3 introduced changes in the internal infrastructure of the products. In this article, we will talk about the installation of FastReport components in Lazarus. The content of the article: 1. What’s new?2. Comparison of versions and products;3. Installing products in Lazarus;3.1 Installing Lazarus for Windows;3.2 Installing Lazarus for Linux;3.3 Installing packages in Windows;3.4 Installing packages in Linux. What’s new? FastReport, a report generation product, consists of several components, including a script engine, report building core, and localization packages. These components are distributed both in Rad Studio and Lazarus. There are new packages in Lazarus. Previously, changing the language required extensive recompilation, but now we have the frLocalizationLibrary.lpk package that handles language switching. Each language is in the form of a separate package, for example, frLanguageGermanPkg.lpk, frLanguageJapanesePkg.lpk, and so on. English, as before, is selected by default, so there is no separate language package for English. Language switching does not even require restarting the application; it can be changed directly during operation. To change the language, you need:1. Place the TfrLocalizationController component on the form (from frLocalizationLibrary.lpk package);2. Select the desired language in its Language property (for example, Italian); the list of languages depends on the packages installed in the IDE;3. Add a language package (for example, frLanguageItalianPkg) in the project inspector;4. Add the package name without the Pkg ending in the main unit code and in the uses section (for example, frLanguageItalian). Additionally, we have allocated the frCoreLibrary.lpk and frGraphicsLibrary.lpk packages. They do not add new components but contain shared code for different products.For convenience, all packages with the .lpk extension have been moved to a single directory. Users will no longer have to manually search for specific packages in different folders.The remaining files are still distributed in directories as before, as required by Lazarus. Additionally, the FastCube product was adapted for the Lazarus platform. You can read more about the FastCube product at this link. Try integrating FastCube into your project using trial components. Comparison of versions and products The best way to look at products is to look at what packages they contain. Package name Package description FastScript FastReport FastCube fs_lazarus.lpk library for script execution + + + frCoreLibrary.lpk auxiliary package with common basic functionality + + + frLocalizationLibrary.lpk language management package + + + frLanguage*Pkg.lpk 40 language packs + + + frGraphicsLibrary.lpk auxiliary package with the general graphical functionality - + - fr_lazarus.lpk package with all the main components of the product - + - frxchartlazarus.lpk package for charts (diagrams) - + - frxe_lazarus.lpk package with exports - + - frxlazdbf.lpk package for working with BDF format database - + - frxlazsqlite.lpk package for working with the SqLite DBMS - + - frxPDFlazarus.lpk package for displaying PDF documents (Windows only) - + - frxrichlazarus.lpk package for displaying Rich documents (recommended for Windows only due to basic package limitations) - + - frCS_lazarus.lpk a package with client-server components, you can find them here - +* - fcxLazarus.lpk package with all the main components of the product - - + fcxprint.lpk package for integration with FastReport - - + fcxprintTee.lpk package for integration with the FastReport Chart (diagrams)  - - + fcxScript.lpk package for integration with FastScript - - + fcxexport.lpk package with FastCube exports - - + fcxCharting.lpk package for charts (diagrams) in FastCube - - + *Client-server components are included in FastReport only in the Enterprise license. Let’s also look at the Trial and Academ licenses of the corresponding products. Trial is needed to test a product before purchasing, Academ is used for educational purposes and is not used in commercial projects. Both licenses include pre-compiled versions of stripped-down packages. FastScript Trial has one limitation—running scripts is not available. Limitations of FastReport Trial:- English only;- Printing and export is limited to 5 pages with a Trial note in the corner;- Missing Rich View. Limitations of FastReport Academ:- Printing and export are marked with an editorial watermark;- Missing Rich View, 2D barcodes, most exports. FastCube Trial has one limitation—the “TrialString” text is displayed in random cells instead of data.   Installing FastReport in Lazarus Let’s start with Lazarus. First, we need to install the software for our operating system. Installing Lazarus for Windows Download the Lazarus installation package from the official website and select the bit depth of your system. For Windows, the Lazarus installer fits into just one .exe file, and there should be no problems with it. Next, we download the required version of the archive from the official website. From the downloaded archive, copy the contents to C:\Windows\System32 and C:\Lazarus, and then reboot Windows. Then we launch Lazarus and configure it. Just click “OK” and agree to the default settings. Installing Lazarus for Linux There are 2 ways to install Lazarus on Linux. The first method is through a package manager. To do this, enter one of the following commands in the terminal: // DEB Users - sudo apt-get install lazarus // RPM Users - sudo yum install lazarus // or sudo dnf install lazarus This is very fast and easy, and this command will install the "stable" version of Lazarus (referring to the latest thoroughly tested version available on your distribution, which may differ for different distributions). The stable version may lag behind the most current version. Unlike Delphi and Rad Studio, our components do not support older versions of Lazarus. Thus, there may be situations where our products will not work with the stable version. Our components for Lazarus are developed only for the latest version of Lazarus. This is especially relevant for major (release) updates of Lazarus. If the stable version differs insignificantly from the current version, there is a high chance that our components will work correctly. Our company is not responsible for the correct operation with this version. As a user, you do this "at your own risk." In the worst case, you will lose some time updating Lazarus to the current version. But even more important is the case of precompiled components (Trial and Academic editions). The main feature of precompiled Lazarus packages is that they will only work on the version of Lazarus on which they were compiled (i.e., the current version). Therefore, we recommend the second method, namely manual installation of the packages. As in Windows, first of all, download the Lazarus installation package from the official website (https://www.lazarus-ide.org/). Each item in this list consists of 4 files (3 installer packages and a text file).- Lazarus installation package (project);- Installation package fpc-src;- Installation package fpc (laz);- README.txt file. It is important to install them in the right order. First fpc (laz), then fpc-src, and lastly, Lazarus (project). Let's take a closer look at the installation process itself. The thing is, the latest Lazarus (project) package in most distributions will have around 100 missing dependencies. Therefore, the easiest way is to install packages through some graphical auxiliary application (for example, QApt or GDebi), which will automatically download the necessary auxiliary packages. But if you use simpler utilities that do not automatically download dependencies (for example, dpkg), then after installation, you will have to install them yourself. This is often done very simply. In our example, after installing the package with unresolved dependencies, you will simply need to enter the following command: sudo apt-get -f install This completes the installation of Lazarus on Linux. Let’s fix the problem with fonts first. All operating systems have default fonts. For example, the Arial font is the default in both Windows and, say, Ubuntu. But in fact, Arial installed by default in Ubuntu is not the same Arial installed in Windows. Thus, text reports created in Windows Lazarus will look bad on Linux Lazarus (and vice versa). To avoid this, let’s immediately install fonts in Linux as in Windows. For Ubuntu you can do this this with the command: sudo apt-get install msttcorefonts However, the command may be different for other Linux distributions. Next, for SqLite to work correctly, install the following packages: sqlite3, libsqlite3-dev. You can read more here (https://wiki.freepascal.org/SQLite). For Ubuntu, this can be done with the command: sudo apt-get install sqlite3 libsqlite3-dev Launch Lazarus and configure it. Click “Ok” and agree to the default settings. Installing packages on Windows Our new Windows installer will install all the packages for you. Just launch it and follow the instructions. It’s also worth noting that you don’t have to search for Lazarus directories all over your computer; you need to use the settings files generated when installing Lazarus. Therefore, our installer will not find your 2 or 3 Lazarus, which you copied by hand. If you want to have several Lazarus on your device and each one has FastReport or our other product, then run the Lazarus installer and check the “multi-install” box to install a second copy of Lazarus. Installing packages on Linux For Linux, you need to download the appropriate .deb or .rpm package from the official website and install it. Now they are simply unpacked into the appropriate folder in the “/usr/share/...” directory. The directory is specified in the description of the package itself. Automatic package installation similar to Windows is not currently planned for Linux. If you are new to Linux, we recommend copying the unzipped product to your home directory (“/home/username/”) to avoid dealing with access rights. As said above, all .lpk files are collected in the Lpks folder. To install packages, click Package -> Open Package File .lpk, select the package in the file manager, and you will see the following window: In it, click Compile for Professional and higher, wait until the compilation is complete, and click Use. For Academic and Trial, immediately click Use. Lazarus will reboot after installing each package. Previously, we mentioned a strict order of package installation. But this approach has become irrelevant for many reasons (an increased number of packages, more complex connections between packages, and also considering that they are all located in the same folder). You can easily find the package that appears in the dependencies of the one you want to install. However, you can install all the packages at once, and Lazarus itself will deal with the compilation order, for this: 1. In Lazarus, select “Package” -> “Open Package File (.lpk)”;2. Select all required packages and click “open”;3. Select “Package” -> “Install/Delete packages”;4. In the “Available for installation” column (on the right), select the required packages;5. Click “Save and restart IDE.” Before version 2.0.0, compilation and (or) installation errors were very common; at the time of writing this document, the latest version is 2.2.6 and this error has not yet been completely removed in Lazarus, but its likelihood has been significantly reduced. If 1 of your packages won’t compile or install, then you’ll have to go down and recompile or reinstall the package’s dependencies. To do this, double-click on the required package, recompile, and then reinstall. After successfully installing all the packages, click on Project -> Open Project and open the project fast-report\LDemo\FRDemo.lpi and try to run it. Then click the Design button. If you get this negative height error in Linux: This bug can be found in some rare GTK interfaces. Just run the application without debugging or check the box next to “Ignore this type of exception.” *Or change the graphical shell. For example, this bug does not appear in the KDE Plasma GTK shell. One last detail that is important for you to know is that our designer uses multithreading, which is disabled by default in Linux Lazarus. To enable it, open the project inspector (Project -> Project Inspector), find the file with the “.lpr” extension, and add the “cthreads” unit as the first item in the “uses” section.
Ler
06 de outubro de 2021

Como usar filtros e opções de ordenação (classificação) no FastCube VCL

A filtragem de dados é essencial ao trabalhar com informações. É difícil imaginar ferramentas analíticas sem tal opção. Na maioria das vezes, filtros e classificação são usados para: acessar dados rapidamente; tornar dados mais fáceis de usar; edição facilitada de dados; estruturação da informação. Você precisa usar a ferramenta Measure para trabalhar com filtros no FastCube VCL. Depois de clicar com o botão esquerdo do mouse, você verá a seguinte janela: Aqui você pode controlar os dados exibidos usando os botões na parte inferior.  - exibe todas measures (medidas);  - remove todas measures (medidas);  - inverte a ordem dos dados exibidos e não exibidos;  - move a measure (medida) um nível para cima;  - move a measure (medida) um nível abaixo;  - aplica alterações. As capturas de tela abaixo mostram como usar os botões para mover as colunas para cima e para baixo na lista funcionam. Também é possível aplicar a filtragem através do menu measures (medidas. Para fazer isso, clique com o botão direito do mouse no item que deseja filtrar e selecione “Filtrar este item” ou “Filtrar todos os outros itens”. O item que você precisa será filtrado. Agora vamos criar um filtro por condição. Clique com o botão direito do mouse em um dos itens da lista de campos e selecione “criar um filtro personalizado”. O filtro personalizado pode ser configurado no editor de intervalo. Pode incluir vários itens, como no exemplo abaixo. Você precisa clicar no botão do editor de medidas para filtrar os itens de agregação por indicador. Esta captura de tela mostra a janela “geral”, onde a filtragem será aplicada apenas para um item agregado. Neste caso, será o item “soma”. Agora você já conhece as opções de filtragem e classificação disponíveis no ambiente analítico FastCube VCL.
Ler
Fast Reports
  • 800-985-8986 (English, US)
  • +31 97 01025-8466 (English, EU)
  • +49 30 56837-3928 (German, DE)
  • +55 19 98147-8148 (Portuguese, BR)
  • info@fast-report.com
  • 66 Canal Center Plaza, Ste 505, Alexandria, VA 22314

© 1998-2025 Fast Reports Inc.