The “Outline” object, as previously stated, represents a report tree which can be displayed in a preview window. Clicking on an element in the tree executes a jump to the report’s output page that contains the corresponding element. It is not necessary to use a script to work with an “Outline” as some bands can automatically create a tree. Let's look at two examples showing how an “Outline” can be used with the help of bands and a script.
Almost all bands have the “OutlineText” property to contain a text expression which automatically creates the tree. The expression is evaluated when creating a report and its value is added to the tree when the band is printed. So the hierarchy of elements in the tree is similar to the hierarchy of bands in the report, meaning that the tree will have main and subordinate elements which correspond to the main and subordinate bands in the report (for example where the report has two levels of data or has groups). We will use our previous example to show the operation of a tree in a report having groups.

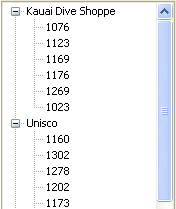
Set the value of the “GroupHeader1.OutlineText” band property to “<Group."Company">.” To make the tree visible as soon as the preview window opens set the “PreviewOptions.OutlineVisible” property of the “Report” object to True. On previewing the report you will now see the following:
Clicking on any element in the tree executes a jump to the corresponding page in the report with the selected element at the top of the window.
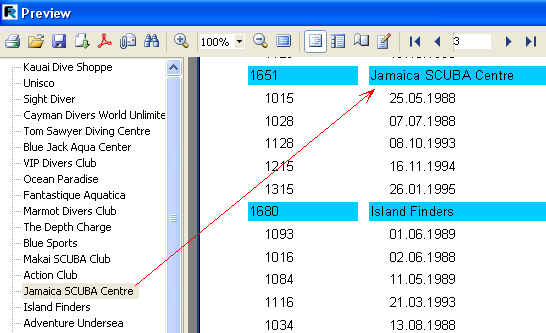
Let's add the second level to the report tree. Just set the “OutlineText” property of the “MasterData” band to “<Group.“OrderNo”>” and the tree will change to this:
It is evident that navigation right down to order numbers is possible, and that the hierarchy of the elements in the tree resembles that in the report.
Now we will create a similar tree, but using a script instead of the “OutlineText” property. In the report clear the “OutlineText” properties of both of the bands and create two event handlers: “GroupHeader1.OnBeforePrint” and “MasterData1.OnBeforePrint”:
PascalScript:
procedure GroupHeader1OnBeforePrint(Sender: TfrxComponent);
begin
Outline.LevelRoot;
Outline.AddItem(<Group."Company">);
end;
procedure MasterData1OnBeforePrint(Sender: TfrxComponent);
begin
Outline.AddItem(<Group."OrderNo">);
Outline.LevelUp;
end;
begin
end.
C++ Script:
void GroupHeader1OnBeforePrint(TfrxComponent Sender)
{
Outline.LevelRoot;
Outline.AddItem(<Group."Company">);
}
void MasterData1OnBeforePrint(TfrxComponent Sender)
{
Outline.AddItem(<Group."OrderNo">);
Outline.LevelUp;
}
{
}
Preview the report to make sure that it works in the same way as previously, where the tree was created automatically. Let's see how the tree is created by the script.
The “Outline.AddItem” method adds a child node to the current tree node and then makes the child node the current one. So if “AddItem” were called several times in a row it would create the “ladder” shown here:
Item1
Item2
Item3
...
The “LevelUp” and “LevelRoot” Outline methods are used to control which element is the current one. The first method moves the cursor to the element located one level up. So this script:
Outline.AddItem('Item1');
Outline.AddItem('Item2');
Outline.AddItem('Item3');
Outline.LevelUp;
Outline.AddItem('Item4');
constructs a tree like this:
Item1
Item2
Item3
Item4
This shows that “Item4” is a child element of the “Item2” element. The “LevelRoot” method on the other hand moves the cursor up to the root of the tree. For example, the script:
Outline.AddItem('Item1');
Outline.AddItem('Item2');
Outline.AddItem('Item3');
Outline.LevelRoot;
Outline.AddItem('Item4');
constructs this tree:
Item1
Item2
Item3
Item4
Knowing this it is clear how the report works. Before every group title (company name) is output the root of the tree is made the current element. After that, the list of orders is output, each order being added as a child element of the company. To ensure that all the orders are located on one level and not displayed as a “ladder”, the “Outline.LevelUp” method is called after each order addition to shift the cursor back to the company level.