A "Data" band allows printing a hierarchical list. For this, one band and one data source are used. Hierarchy must be defined in the data source with the help of two data columns:
| 1. | Key column. This is the data row identifier. |
| 2. | Column which contains the key of this item's parent. |
In order to print such a source in a hierarchical form, you need to set the following "Data" band properties. This can be done in the "Properties" window:
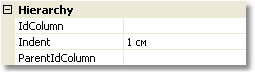
| • | indicate the key column in the "IdColumn" property; |
| • | indicate the column containing parent value, in the "ParentIdColumn" property; |
| • | indicate the hierarchy indent in the "Indent" property. |
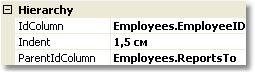
Let us look at an example of how to print a hierarchy of employees from the "Employees" demo table. The table has got two columns which we need:
| • | EmployeeID column is the key and contains the employee ID; |
| • | ReportsTo column contains the ID of "parent" employee. |
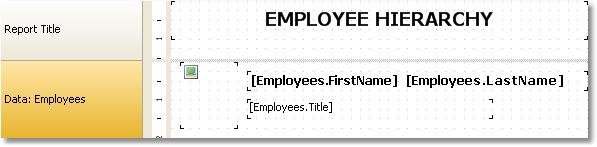
Create a report that looks like the following:
Set the "Data" band properties, which is responsible for the hierarchy, in the following way:
When we run a report, we will see the following:

When printing hierarchy, FastReport shifts the band to the right (by a value indicated in the Indent property), and also decreases the band width by the same value. This allows you to use the Anchor property of band's objects. Here is possible values for this property that can be used in this case:
| • | Left, Top (by default) - the object is moved with the band; |
| • | Right, Top - the object stays in its original position; |
| • | Left, Right, Top - the right side of the object stays at its original position, the left side is moved with the band. |
It allows you to get some useful effects:
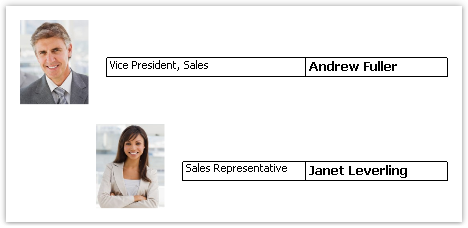
In this example, the picture object has Anchor property set to Left, Top; the object with job title is anchored to Left, Right, Top; the object with the name is anchored to Right, Top.