In all the examples we have looked at, the matrix was filled with data automatically because it was connected to data source. Data source for the matrix is indicated in the "DataSource" property. Though we did not set the value of this property manually, it occurred implicitly while adding data columns to the matrix.
Using script it is possible to fill in the matrix manually. For this, it is needed to create the "ManualBuild" event handler of the matrix. Call "AddValue" method in the handler code to add a value. Let us show how to create a matrix which will print a 10х10 table of the following kind:
|
1 |
2 |
3 |
... |
1 |
1 |
|
|
|
2 |
|
2 |
|
|
3 |
|
|
3 |
|
... |
|
|
|
... |
Do the following:
| • | add an empty matrix into the report; |
| • | put any element from the "Data" window into the row, column and cell of the matrix. Then call expression editor by double clicking the matrix element and clear an expression; |
| • | clear the "DataSource" property of the matrix. |
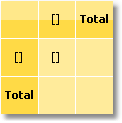
These steps are required to create a "dummy" matrix which has one row, column and cell. As a result the matrix will be as follows:
Now create a "ManualBuild" event handler. For that, select the matrix, go "Properties" window and press the ![]() button. Double click the "ManualBuild" event and FastReport will create an empty event handler. Write the following code in it:
button. Double click the "ManualBuild" event and FastReport will create an empty event handler. Write the following code in it:
private void Matrix1_ManualBuild(object sender, EventArgs e)
{
// Our matrix has one level in row, column and cell.
// Create 3 arrays of object[] type, each with one element
// (per number of levels).
object[] columnValues = new object[1];
object[] rowValues = new object[1];
object[] cellValues = new object[1];
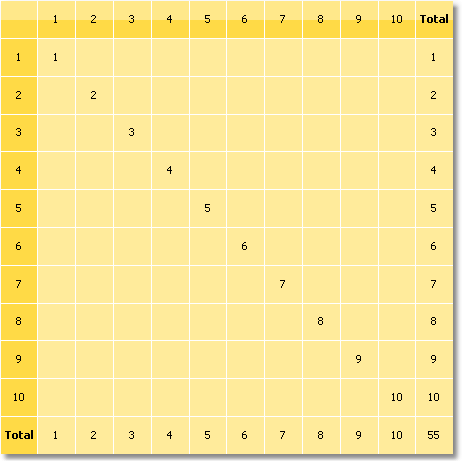
for (int i = 1; i <= 10; i++)
{
// Filling arrays
columnValues[0] = i;
rowValues[0] = i;
cellValues[0] = i;
// Adding data into the matrix
Matrix1.AddValue(columnValues, rowValues, cellValues);
}
}
In a handler, you should use the "AddValue" method of the "Matrix" object in order to fill it with data. This method has three parameters each of which is an array of System.Object type. The first parameter is a column value, the second one is the row value, and the third one is the cell value. Note that the number of values in every array should comply with the object's settings! In our case an object has one level in column, row and cell, correspondingly we supply one value for columns, one for rows and one for cells.
When we run the report, we will see the following:
Let us demonstrate how to add a value "21" to the matrix, at the intersection of column 7 and row 3. For that, change a code in the following way:
private void Matrix1_ManualBuild(object sender, EventArgs e)
{
object[] columnValues = new object[1];
object[] rowValues = new object[1];
object[] cellValues = new object[1];
for (int i = 1; i <= 10; i++)
{
columnValues[0] = i;
rowValues[0] = i;
cellValues[0] = i;
Matrix1.AddValue(columnValues, rowValues, cellValues);
}
columnValues[0] = 7;
rowValues[0] = 3;
cellValues[0] = 21;
Matrix1.AddValue(columnValues, rowValues, cellValues);
}
As a result, we have the following:
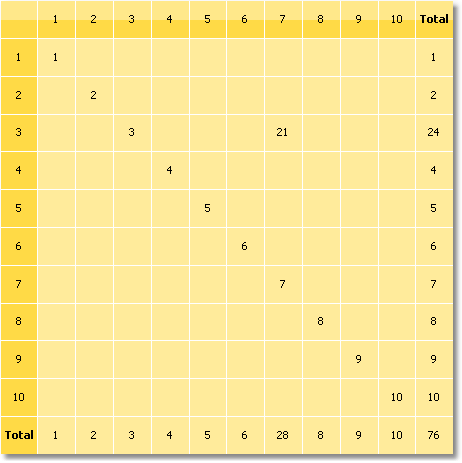
As seen, the matrix automatically calculates the totals.
You can use the "ManualBuild" event handler for the matrix which is connected to data. In this case, event handler is called first, then the matrix is filled with data from the data source.