If any of the methods shown above do not achieve the required report look then a report script can be used instead. The “Cross-tab” object has the following events:
Event |
Description |
OnAfterPrint |
event is called after printing a table |
OnBeforePrint |
event is called before printing a table |
OnCalcHeight |
event is called before calculating height of a row in the table the event handler can be set to either the required height or to “0” if the row needs to be hidden |
OnCalcWidth |
event is called before calculating column width in a table the event handler can be set to either the required width or to “0” if the column needs to be hidden |
OnPrintCell |
event is called before displaying a table cell the event handler can modify the cell design or its contents |
OnPrintColumnHeader |
event is called before displaying the column title the event handler can modify the design or content of the title cell |
OnPrintRowHeader |
event is called before displaying the row title the event handler can modify the design or content of the title cell |
We can use the following methods of the “Cross-tab” object in these events:
Method |
Description |
function ColCount: Integer |
returns the number of columns in the table |
function RowCount: Integer |
returns the number of rows in the table |
function IsGrandTotalColumn (Index: Integer): Boolean |
returns “True” if the 'Index' column is a total |
function IsGrandTotalRow (Index: Integer): Boolean |
returns “True” if the 'Index' row is a total |
function IsTotalColumn (Index: Integer): Boolean |
returns “True” if the 'Index' column is a sub- total |
function IsTotalRow (Index: Integer): Boolean |
returns “True” if the 'Index' row is sub-total |
procedure AddValue (const Rows, Columns, Cells : array of Variant) |
adds a value to the table |
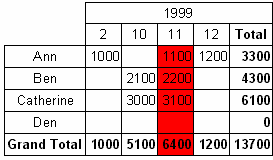
Let's show how to highlight the third column (in our example the “November 1999” date). Select the cross-tab object on the report design page, in the object inspector click on the events tab, locate the “OnPrintCell” event and create a handler on the code page by double-clicking in the empty list to the right of the event name. The script editor will appear with the basic declaration created for you, then add the code required in the empty 'begin...end' block of the declaration:
Pascal script:
procedure Cross1OnPrintCell(Memo: TfrxMemoView;
RowIndex, ColumnIndex, CellIndex: Integer;
RowValues, ColumnValues, Value: Variant);
begin
if ColumnIndex = 2 then
Memo.Color := clRed;
end;
C++ Script:
void Cross1OnPrintCell(
TfrxMemoView Memo,
int RowIndex,
int ColumnIndex,
int CellIndex,
Variant RowValues,
Variant ColumnValues,
Variant Value)
{
if (ColumnIndex == 2) { Memo.Color = clRed; }
}
We will see the following when the report is previewed:
To highlight a column title, create an “OnPrintColumnHeader” event handler in a similar way :
Pascal script:
procedure Cross1OnPrintColumnHeader(Memo: TfrxMemoView;
HeaderIndexes, HeaderValues, Value: Variant);
begin
if (VarToStr(HeaderValues[0]) = '1999') and
(VarToStr(HeaderValues[1]) = '11') then
Memo.Color := clRed;
end;
C++ Script:
void Cross1OnPrintColumnHeader(
TfrxMemoView Memo,
Variant HeaderIndexes,
Variant HeaderValues,
Variant Value)
{
if ((VarToStr(HeaderValues[0]) == "1999") &&
(VarToStr(HeaderValues[1]) == "11"))
{
Memo.Color = clRed;
}
}
The report preview is now:

This is how the script works: the “OnPrintCell” event handler is called before printing a cell in the table’s data area (note that cells in the table titles call either the “OnPrintColumnHeader” or the “OnPrintRowHeader” handler). The “OnPrintCell” handler parameters include: a link to the “Text” object which represents the table cell (the “Memo” parameter) and the cell’s “address” as the location of the row, column and cell (cell is relevant if your cross-tab contains multi-leveled cells) as the “RowIndex”, “ColumnIndex”, and “CellIndex” parameters respectively. The parameter list also has the header's values specified as Variants (the “RowValues” and “ColumnValues” parameters) and the “Value” Variant parameter which holds the cell contents.
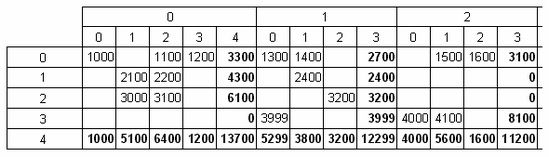
In our example it is easier to specify the “address” using the “RowIndex” and “ColumnIndex”. Numbering of columns and rows begins at “0” so “ColumnIndex = 2” refers to the third column. We could also specify the correct column by looking at its data content (we need the 11th month of 1999):
Pascal script:
procedure Cross1OnPrintCell(Memo: TfrxMemoView;
RowIndex, ColumnIndex, CellIndex: Integer;
RowValues, ColumnValues, Value: Variant);
begin
if (VarToStr(ColumnValues[0]) = '1999') and
(VarToStr(ColumnValues[1]) = '11') then
Memo.Color := clRed;
end;
C++ Script:
void Cross1OnPrintCell(
TfrxMemoView Memo,
int RowIndex,
int ColumnIndex,
int CellIndex,
Variant RowValues,
Variant ColumnValues,
Variant Value)
{
if ((VarToStr(ColumnValues[0]) == "1999") &&
(VarToStr(ColumnValues[1]) == "11"))
{
Memo.Color = clRed;
}
}
The “RowValues” and “ColumnValues” parameters are arrays of the Variant type, having a zero base. The “0” element is at the highest level of the table title, the “1” element is at the next level, etc. In our example “ColumnValues[0]” contains years and “ColumnValues[1]” contains months.
Why is the “VarToStr” function required? This prevents errors during type conversion. When working with the Variant type FastReport tries to automatically cast strings to number format, which in turn can lead to errors when casting the “Total” and “Grand Total'” column values.
The “OnPrintColumnHeader” event handler is called during output of the column title cells. The parameter list is similar to that of the “OnPrintCell” handler, though in this case the cell's “address” (“HeaderIndexes” and “HeaderValues” parameters) is in a different form. The “HeaderValues” parameter holds the same values as the “ColumnValues” and “RowValues” in the “OnPrintCell” handler. The “HeaderIndexes” parameter is also an array of values of Variant type, and contains the address of the title cell in a different form: the “0” element is the index at the highest level in the table title, the “1” one is at the next level, etc. To clarify the principle of cell numbering refer to the picture below:
In our example it was easier to use the “HeaderValues” parameter, but the following handler could be used instead:
Pascal script:
procedure Cross1OnPrintColumnHeader(Memo: TfrxMemoView;
HeaderIndexes, HeaderValues, Value: Variant);
begin
if (HeaderIndexes[0] = 0) and (HeaderIndexes[1] = 2) then
Memo.Color := clRed;
end;
C++ Script:
void Cross1OnPrintColumnHeader(
TfrxMemoView Memo,
Variant HeaderIndexes,
Variant HeaderValues,
Variant Value)
{
if ((HeaderIndexes[0] == 0) && (HeaderIndexes[1] == 2)) { Memo.Color = clRed; }
}